How to add a cookie banner to your website?
This article is for you if you keep hearing that "the website needs a cookie banner" but are not sure what it is for or what you are supposed to do. Everything below is in plain words, no technical jargon.
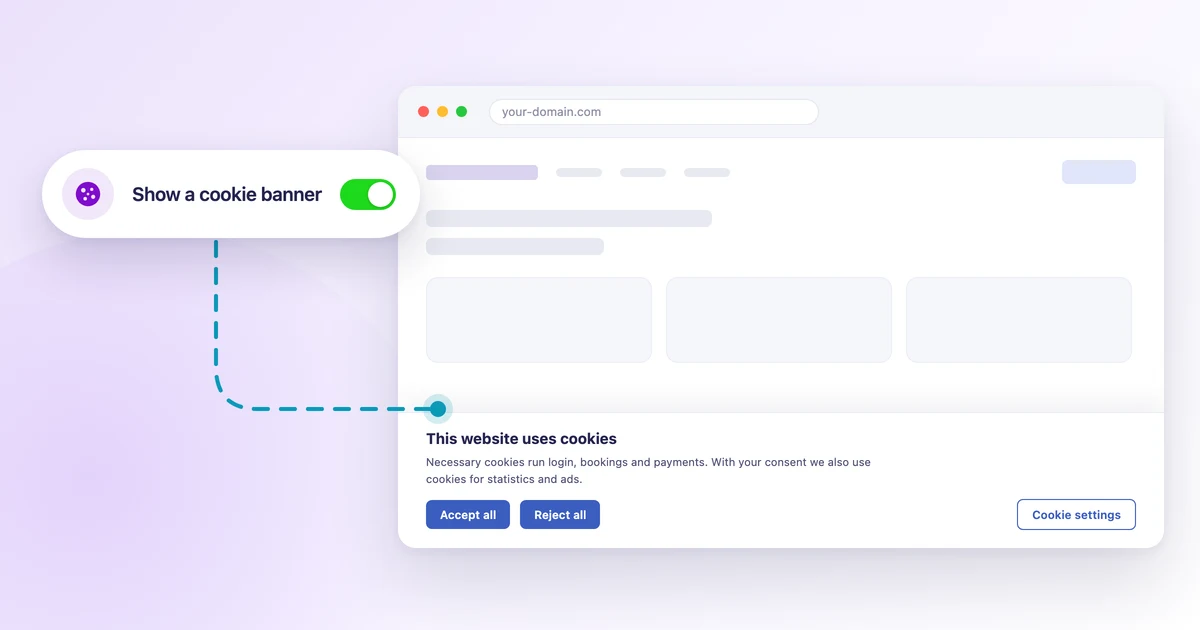
In short: you switch the banner on with one tick in the website builder, on the General tab, under Integrations and advanced. The texts and the categories fill in by themselves, and Google Tag Manager and your own code stop running until the visitor gives consent.
Why is there a cookie banner at all?
Cookies are small files a website stores in the visitor's browser. Some of them are necessary: without them a visitor cannot log in, book an appointment or pay. Nobody has to ask for consent to those.
Other cookies track people: they count visits (Google Analytics, for example) or let you show ads for your business elsewhere (Google Ads, Meta). The law is clear: these cookies may only be switched on after the visitor agrees. The banner exists to ask for that consent and remember the answer.
Do you need a banner? Ask yourself one question: does your website use Google Analytics, the Meta Pixel or other custom scripts, Google Tag Manager, a chat or a map?
Yes. Switch the banner on. Without it these tools track visitors without asking.
No. A banner is not required. The Calendesk booking website itself has no tracking tools. It only sets cookies the site needs to work: login, Stripe (if you take payments) and reCAPTCHA (bot protection on forms). We treat them as necessary, but you have to describe them in your privacy policy.
What does the visitor see?
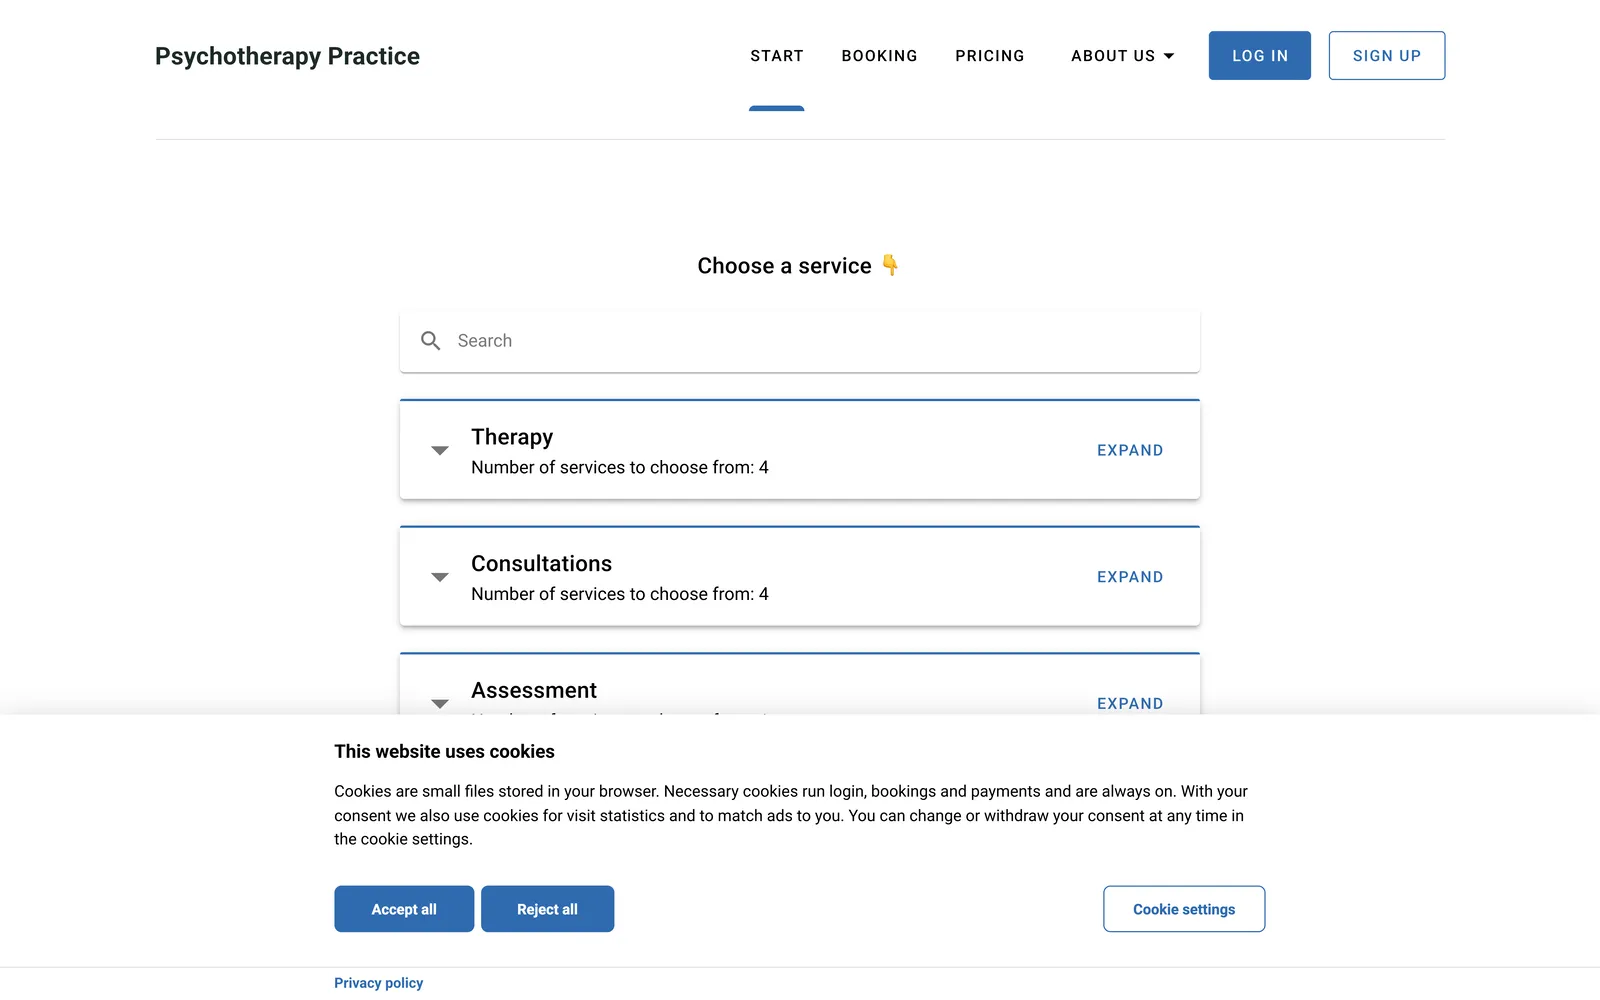
On the first visit a bar appears at the bottom of the page: a short text and three buttons: "Accept all", "Reject all", "Cookie settings". The bar does not block the page, so the visitor can book without touching it.
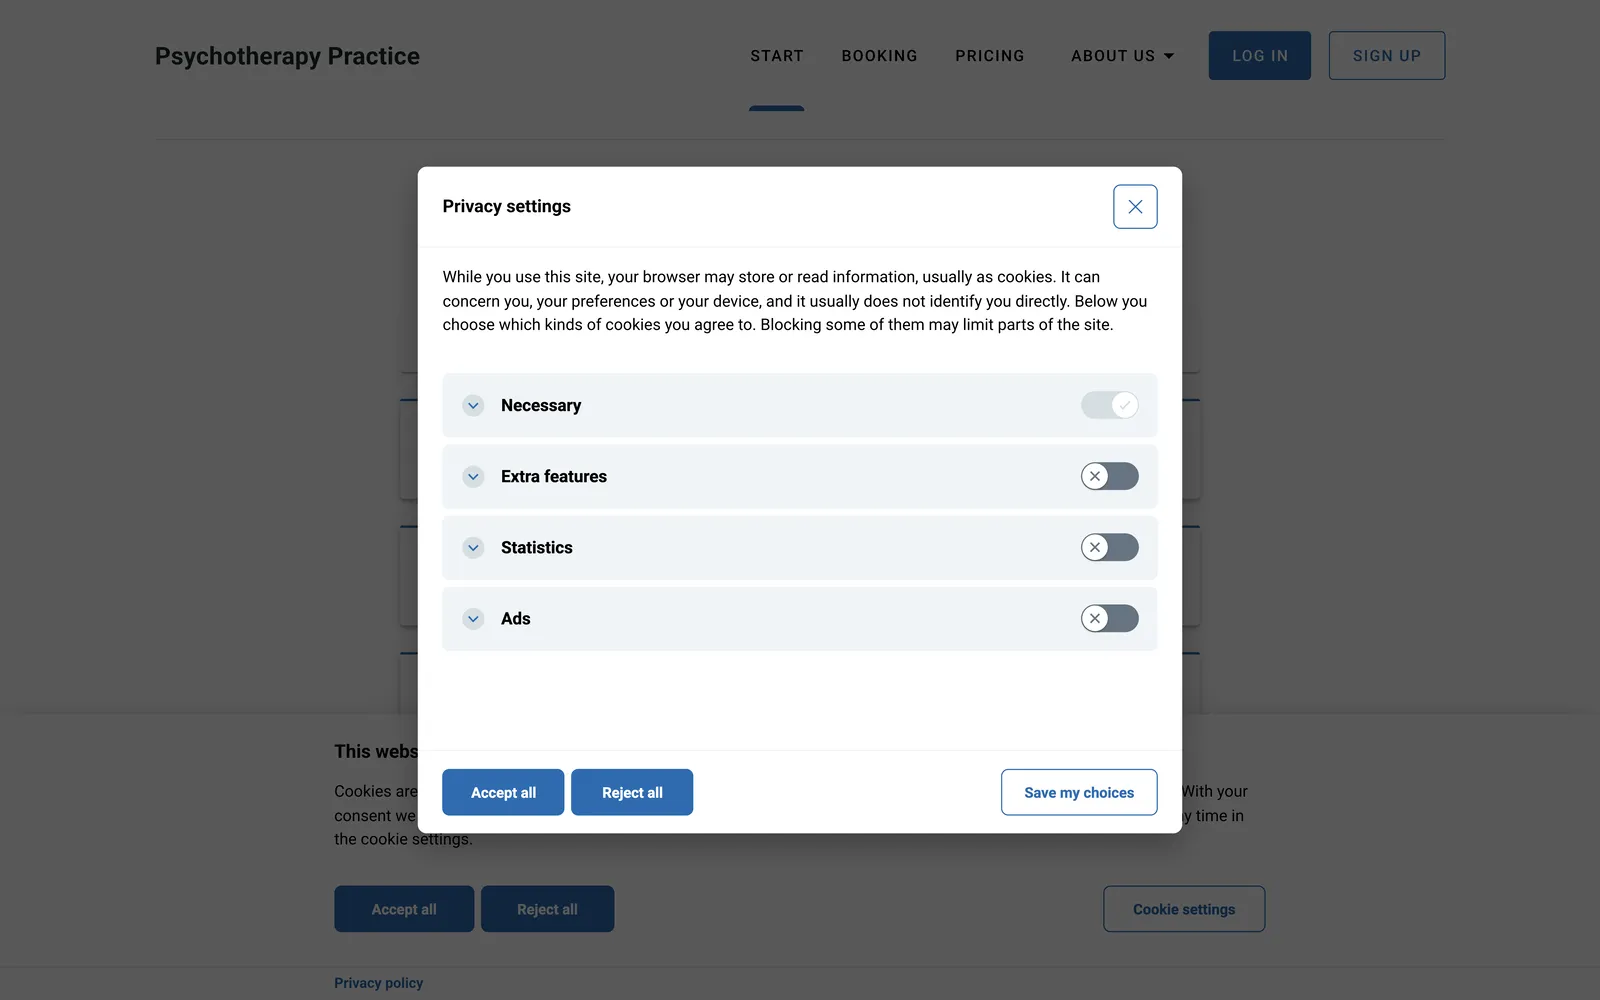
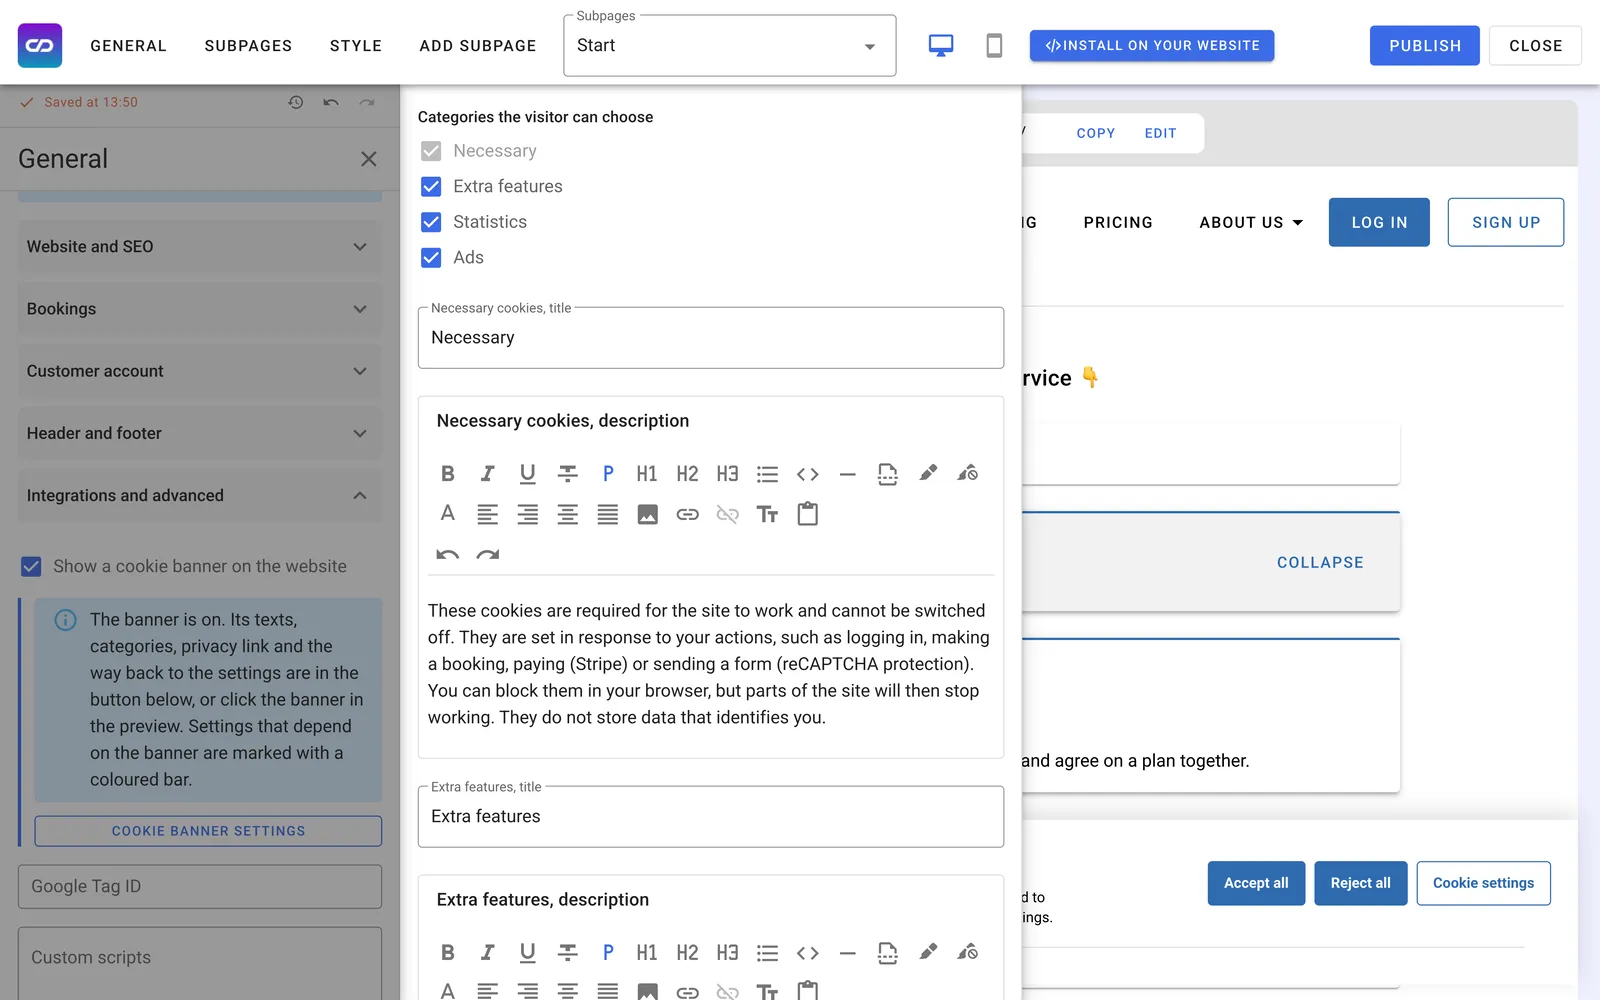
In "Cookie settings" the visitor sees the categories, decides on each one separately and confirms with "Save my choice":
Necessary: always on, cannot be switched off.
Extra features: chat, map, embedded videos.
Statistics: counting visits, for example Google Analytics.
Ads: tailored ads, for example Google Ads or Meta.
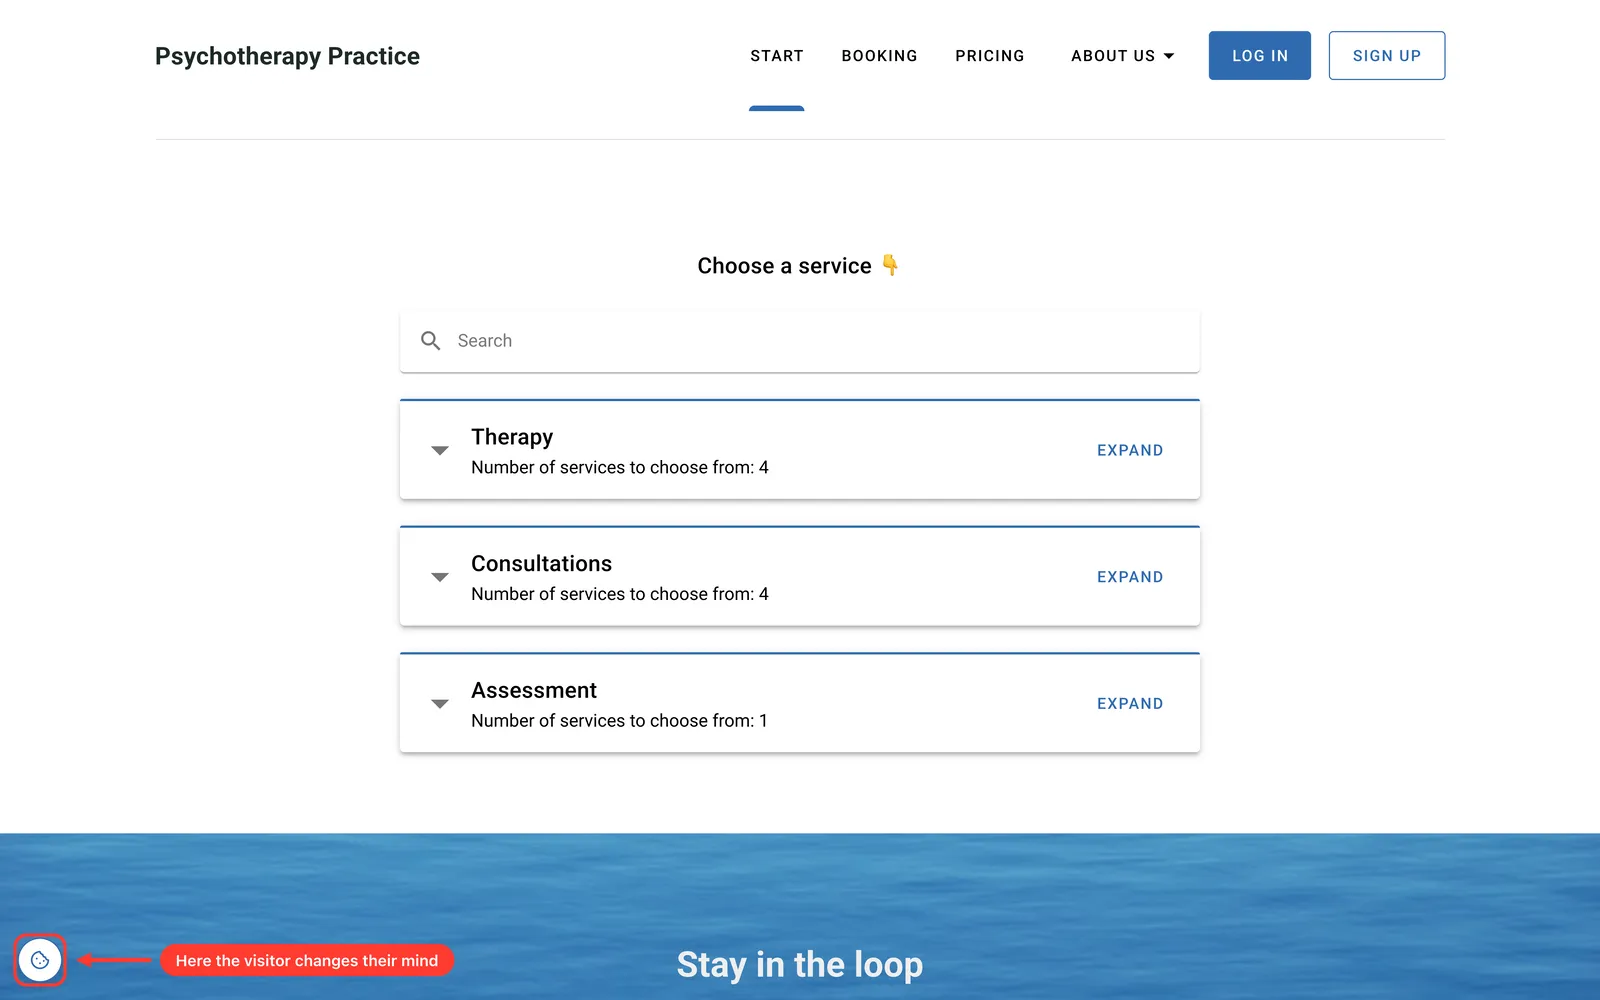
After the decision the bar disappears. The visitor can come back to the settings and change their mind at any time: through a small cookie icon in the bottom-left corner, or through a "Cookie settings" link in the footer or menu. Which one your site uses is your choice (see below).
The decision is remembered for six months. The visitor does not see the bar on every visit.
What does the banner do behind the scenes?
The main rule: until the visitor accepts, tracking tools do not start. Google Tag Manager waits, pasted-in code waits. Only what the site needs to work is running: login, bookings, payments (Stripe) and bot protection on forms (reCAPTCHA). Stripe and reCAPTCHA set their own cookies and the "Necessary" category description names them, but describing them in your privacy policy is your part.
When the visitor accepts everything, the tools start right away. When they accept only part, for example statistics but not ads, only the tools in the accepted category start. When they reject, nothing starts.
If the visitor withdraws consent later, the page reloads and the tools from the withdrawn category no longer start. When statistics consent is withdrawn, the banner also clears the Google Analytics cookies from the browser.
What do you have to do? Six steps
Open the website builder, go to the General tab and expand Integrations and advanced.
Tick "Show a cookie banner on the website". Every banner text fills in with ready, reviewed wording. If you have a Google Tag Manager id or custom code in place, the builder switches them to the safe "after consent" mode by itself.
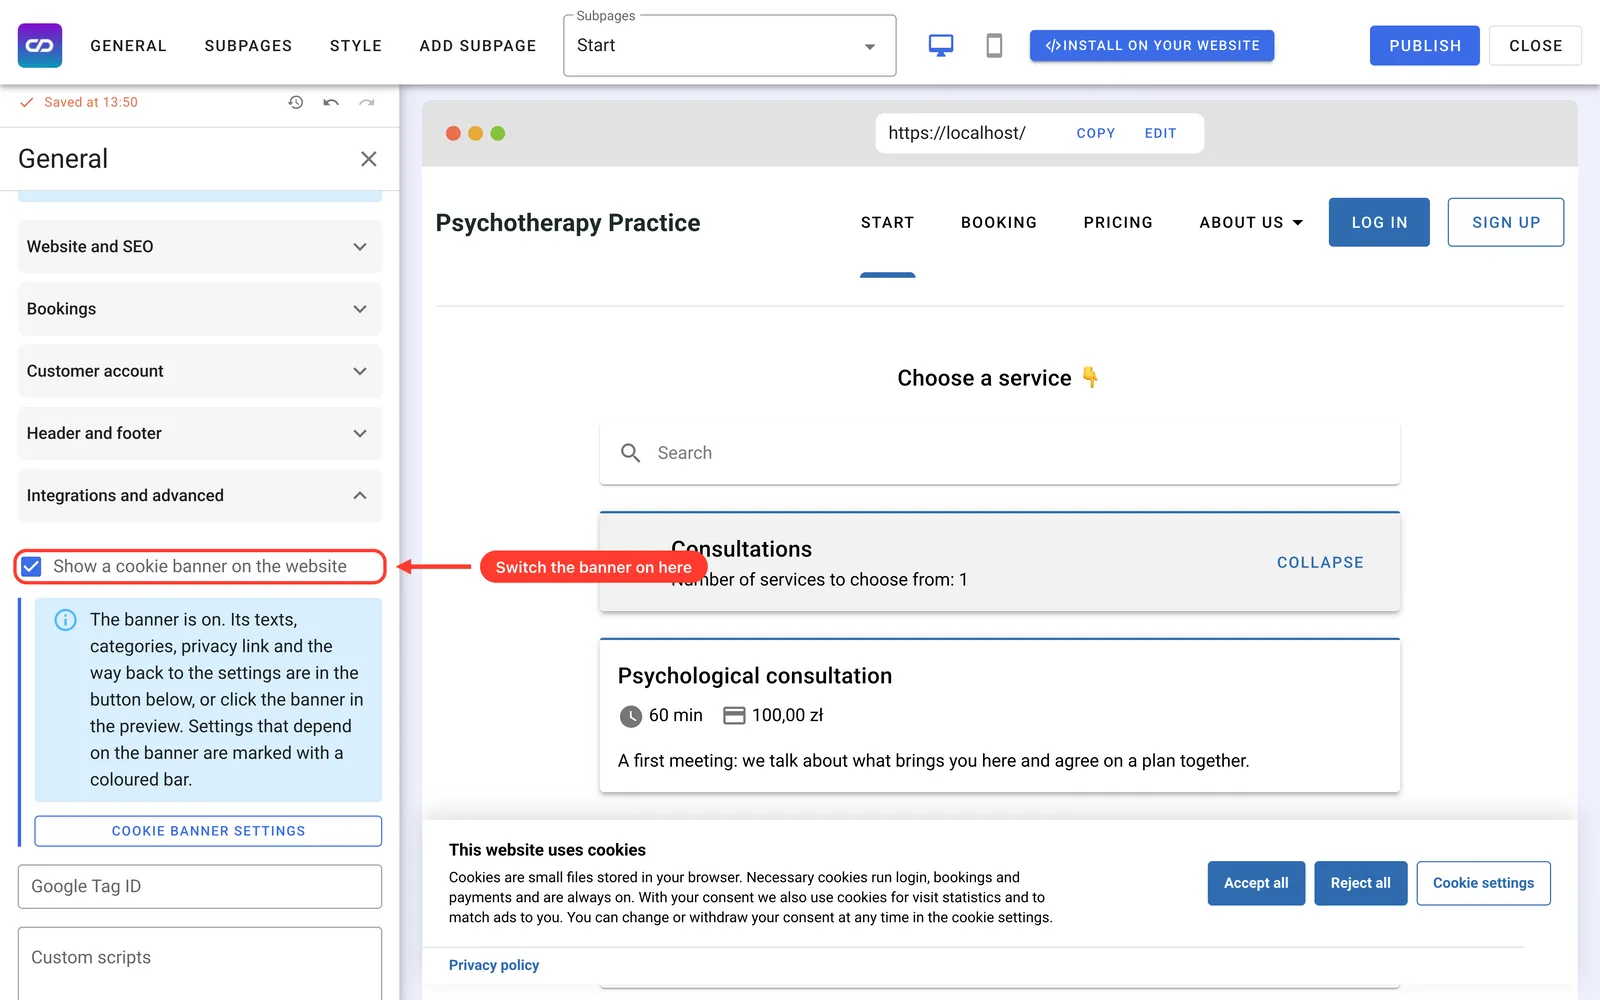
Review the texts. Click "Cookie banner settings" or click the banner in the page preview. You can change every word: the title, the text, the buttons, the category descriptions. Usually you can leave them as they are.
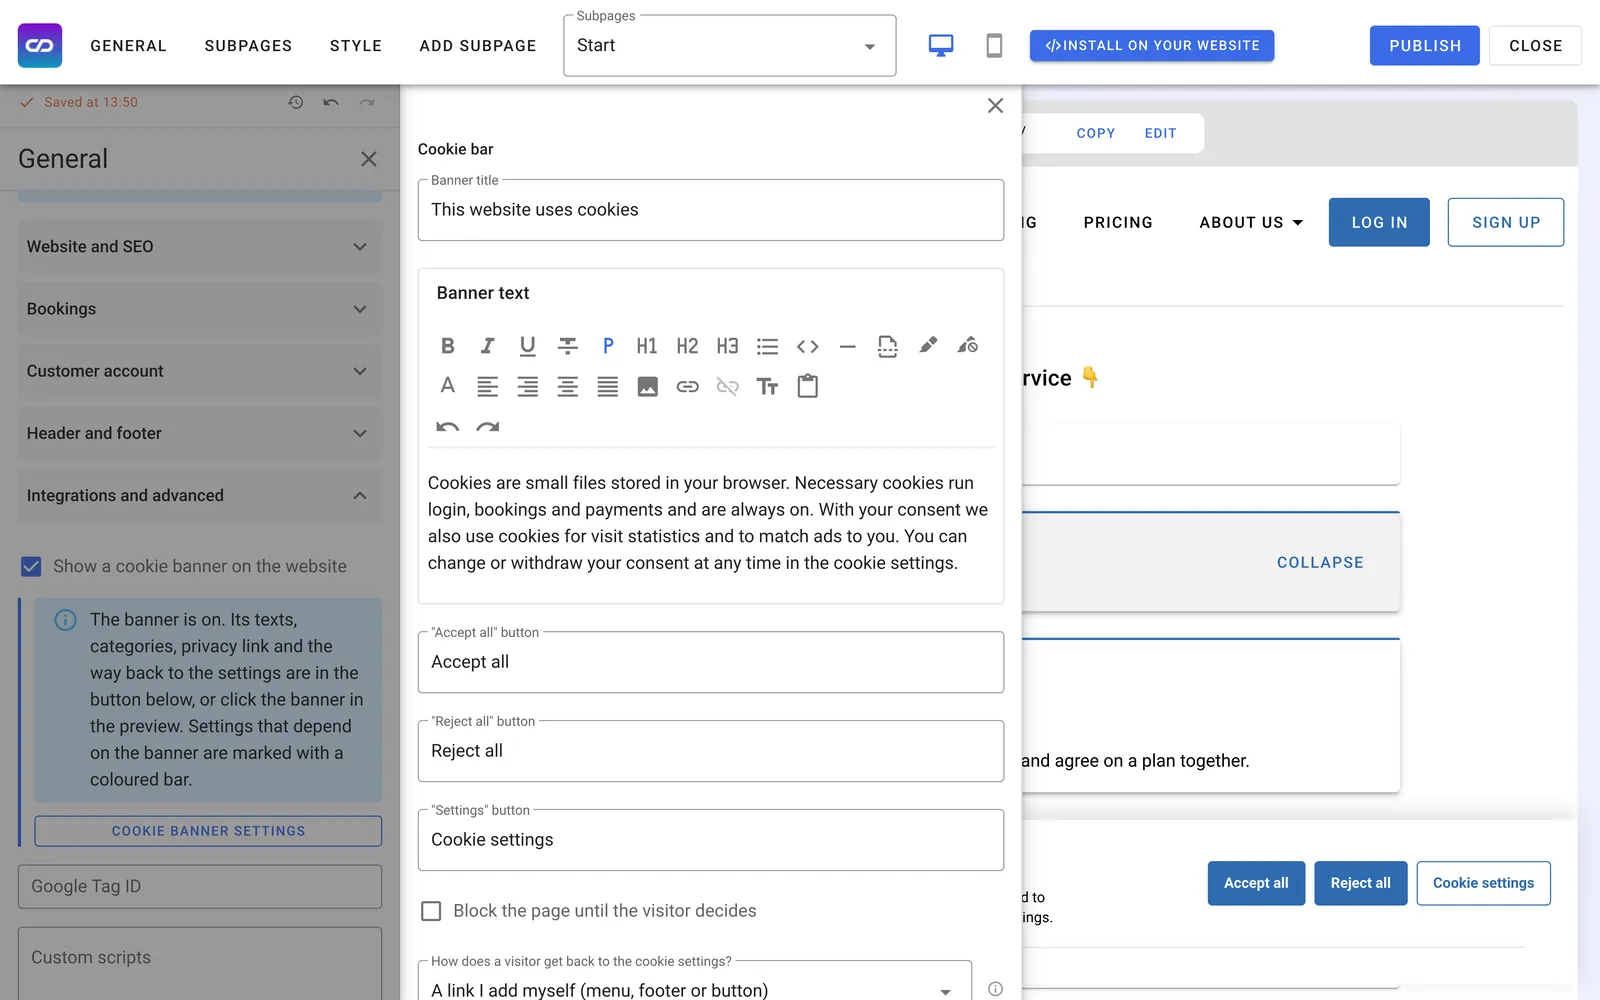
Set the privacy policy link. In the settings, in the field "Where does the link lead?", pick a page of your website or an external address. If you have no privacy policy yet, leave "No link", but it is worth having one.
Decide how visitors get back to the settings. In the settings, the field "How does a visitor get back to the cookie settings?". The default is a cookie icon in the corner of the page, which needs nothing from you. Prefer a footer link, the way most websites do it? See "Icon in the corner or a footer link?" below.
Pick the categories and publish the site. Untick the categories you do not use. No ads? Untick "Ads" and the visitor sees a shorter list. Then click "Publish".
The banner appears only on the published site. Inside the builder you see a preview of it.
Icon in the corner or a footer link?
The law requires that withdrawing consent is as easy as giving it. You can choose between several places, and each of them meets that requirement:
A cookie icon in the corner of the page. Always visible after the visitor's decision. Nothing for you to do. This is how ready-made cookie plugins work.
A footer link. The way most large websites do it: "Cookie settings" next to the terms and the privacy policy. It covers nothing.
An entry in the header menu. The same page as in the footer, just shown in the menu.
A button in any section or a link in your own code. It only has to point to the address
#cookie-settings.
You can combine them, for example the icon and a footer link.

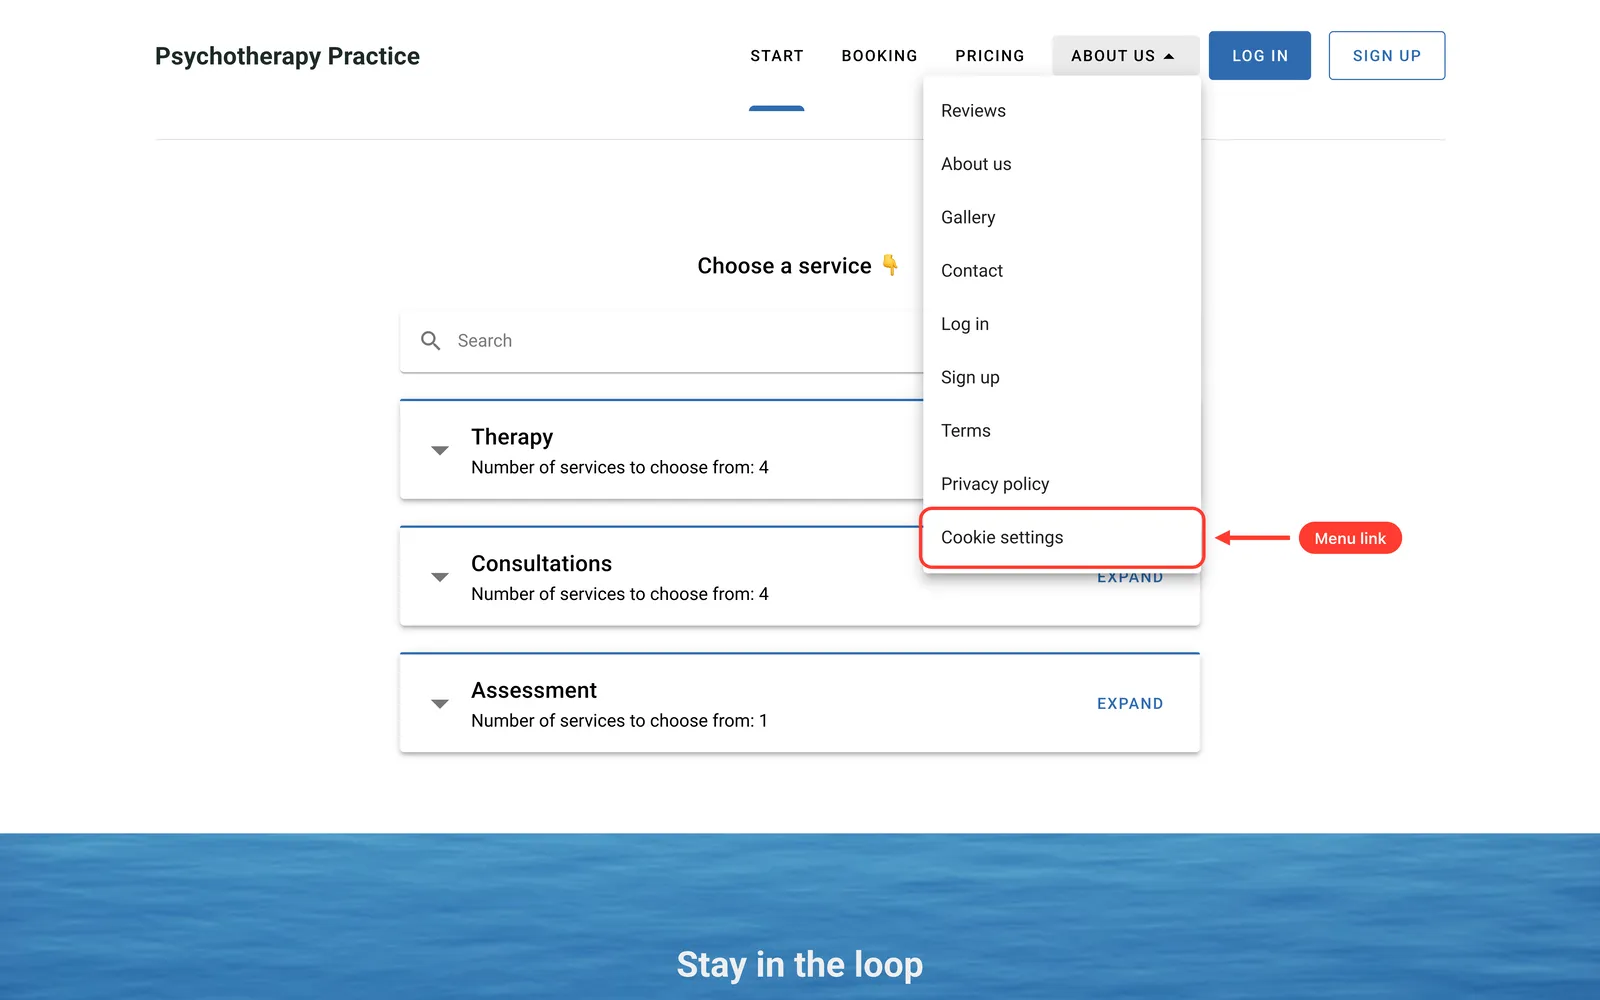
How to add a footer or menu link:
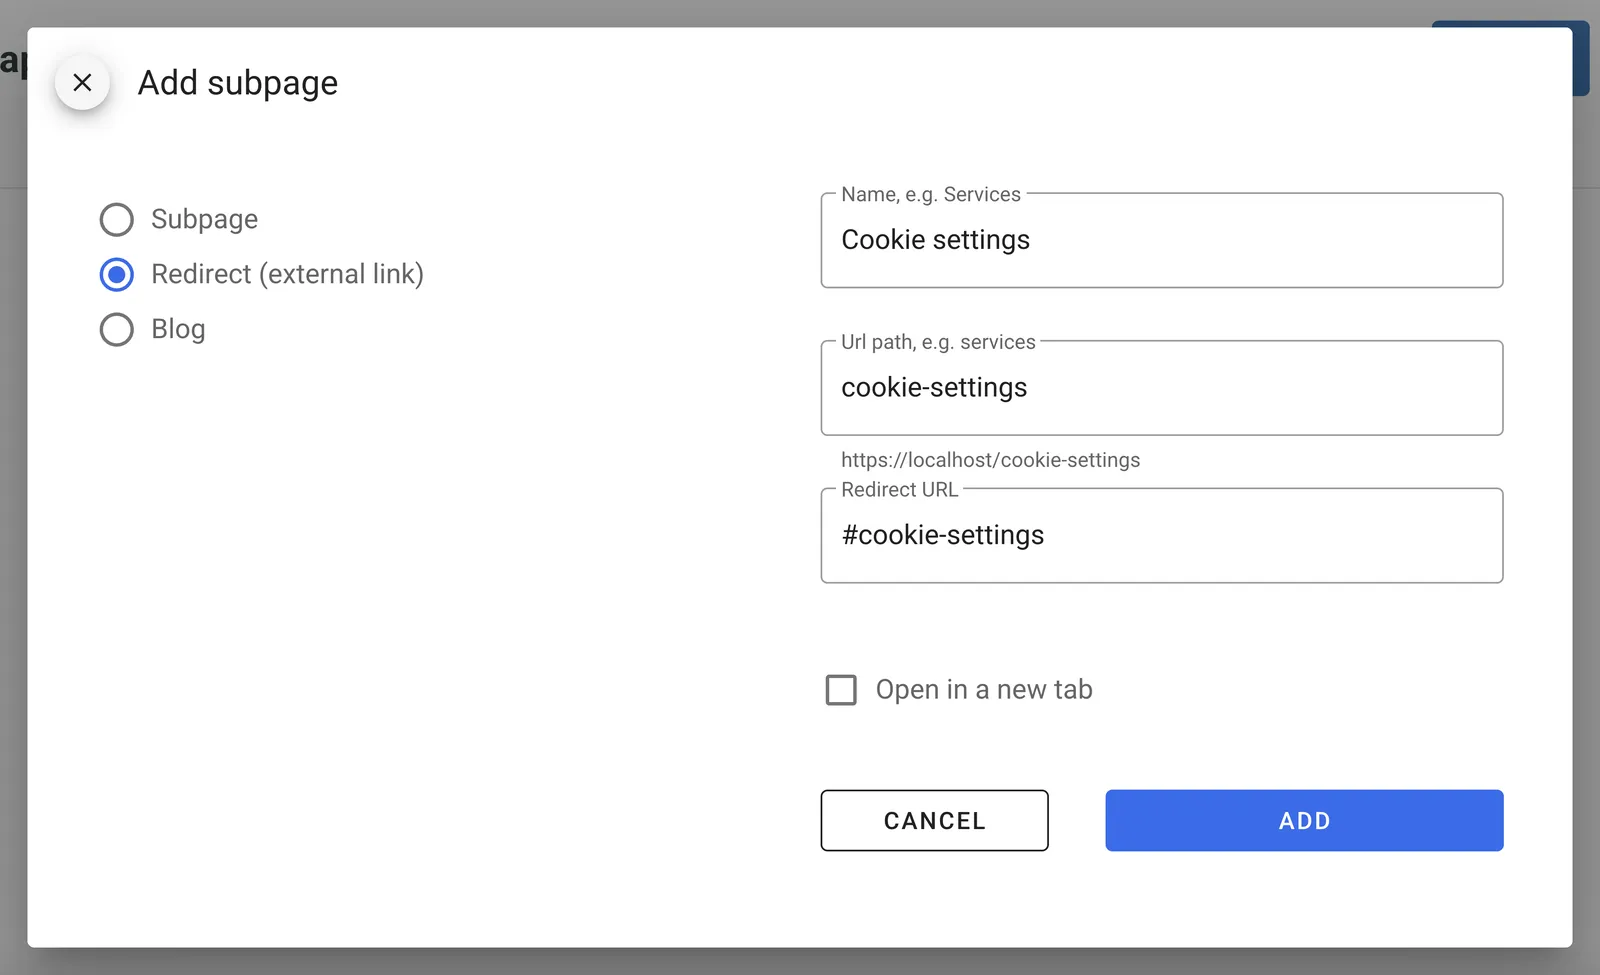
In the builder click Add subpage and choose the type Redirect (external link).
Fill in the three fields: Name is "Cookie settings", Url path is
cookie-settings, and Redirect URL is exactly#cookie-settings. Click Add.
Click the footer or the header in the preview and add this page to its list of pages, like any other page.
In the banner settings, in "How does a visitor get back to the cookie settings?", choose "A link I add myself" or "Both".
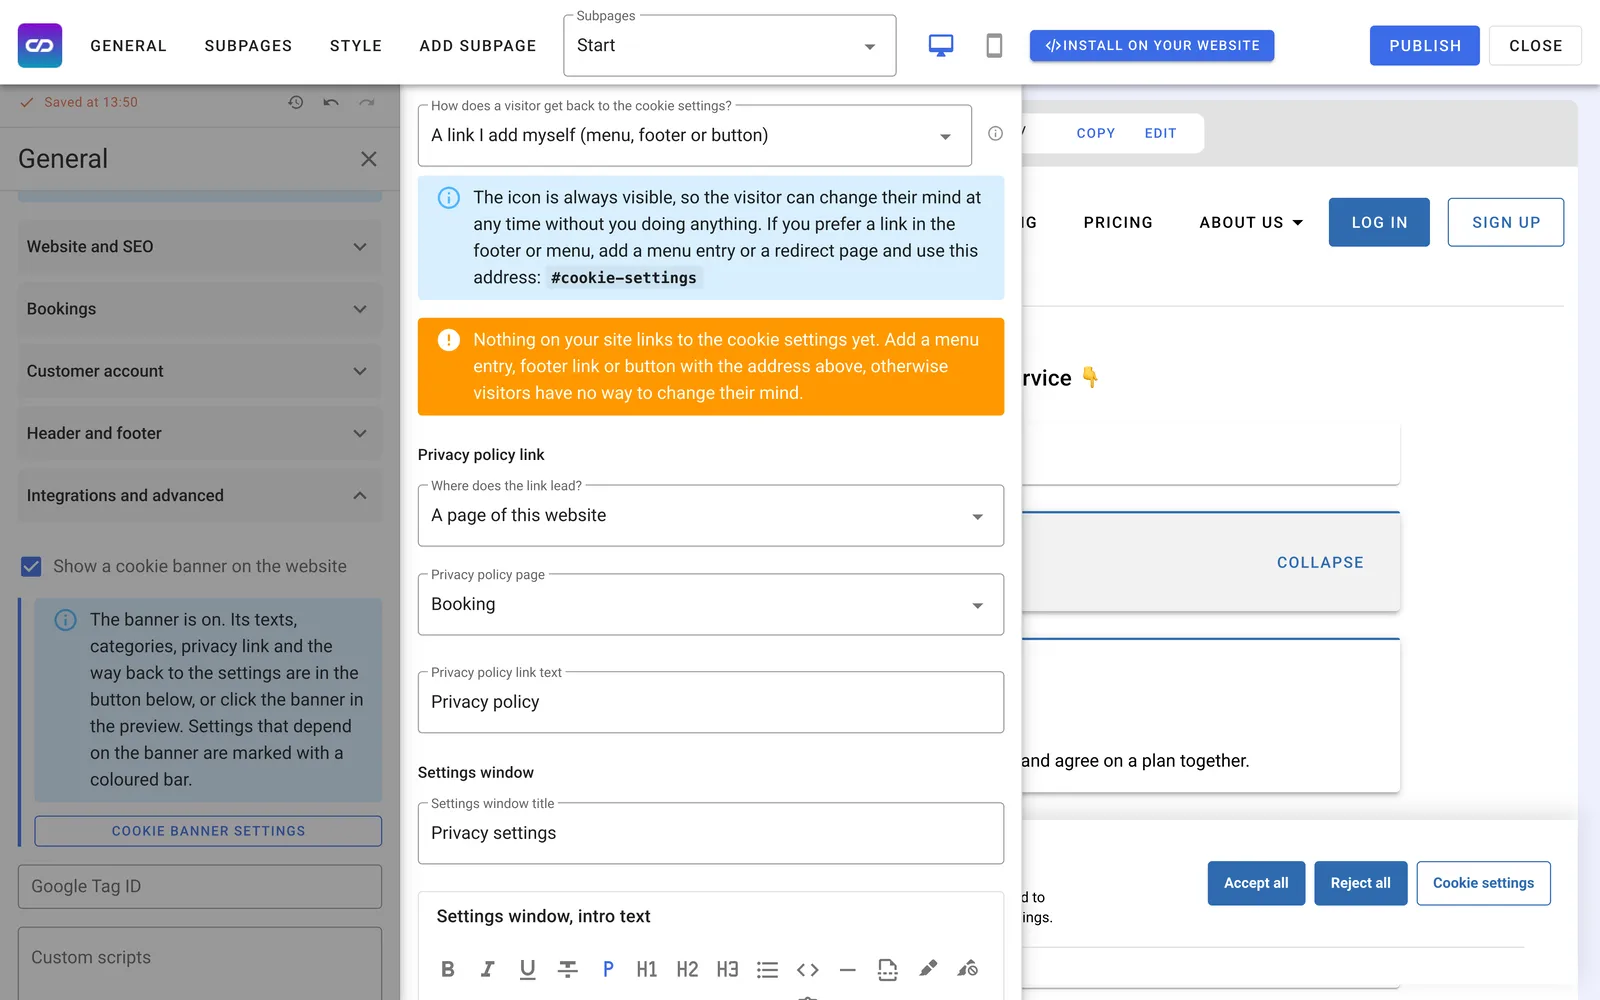
Until something on the site points to that address, the builder shows an orange warning. Do not ignore it: a visitor with no link and no icon has no way to change their mind.
Do you use Google Tag Manager? Read this
Next to the Google Tag ID field a choice appears: "When to start Google Tag Manager". Keep "After the visitor agrees to cookies". The container then stays off until the visitor accepts statistics or ads. It is the safest setting and needs no work in Google Tag Manager on your side.
The second mode, "Right away, passing the visitor's choice to Google", is for people who have set in their own container which tags require consent. If that sentence means nothing to you, do not pick it.
One thing worth knowing: Google's own tags (Google Analytics, Google Ads) understand the visitor's consent by themselves. Tags from other companies in your container, for example the Meta Pixel, start together with the container. If you use such tags and want them to depend on a specific category, set a consent requirement on them in Google Tag Manager. If an agency handles this for you, forward them this article.
Do you paste in your own code? Read this
Next to the "Custom scripts" field a choice appears: "When to run your custom code". Pick the category that matches what you pasted:
After consent to ads: the Meta Pixel, TikTok, LinkedIn and other advertising tools.
After consent to statistics: Google Analytics pasted by hand, Hotjar and similar.
After consent to extra features: chat, map, embedded videos.
Always: only code that does not track visitors, for example fonts.
Several different tools in one field? Each script can carry its own category. Add two attributes to it:
<script type="text/plain" data-category="marketing">
  ...pixel code...
</script>
Instead of marketing use analytics (statistics) or functionality (extra features). A script marked this way waits for consent to its own category, whatever the setting for the whole field.
Frequently asked questions
Can I change the banner texts?
Yes, every one of them. The title, the description, the buttons, the settings window text and the category descriptions. Category descriptions can be formatted: bold, links, lists.
I already have a banner from another company pasted into my code. What now?
Do not switch the Calendesk banner on. Two banners on one page confuse visitors. Keep the one you have, or remove it and switch ours on.
Since switching the banner on I see fewer visits in my statistics. Is something broken?
No. Only visitors who accepted cookies reach the statistics. Every banner that follows the law works this way.
Why do visitors who already answered see the banner again?
Because you changed something that affects which tools load: the Google Tag Manager mode, the custom code setting, the code itself or the list of categories. Then the visitor has to decide again. Changing only the texts does not ask again.
Can a visitor withdraw consent?
Yes. With the cookie icon in the corner or the "Cookie settings" link they open the settings window and switch off what they want. The page reloads and the withdrawn tools no longer start.
I do not want the icon in the corner. Can I turn it off?
Yes, but first add a settings link in the footer or menu, as described in "Icon in the corner or a footer link?". Then, in the banner settings, choose "A link I add myself".
Can I block the page until the visitor answers?
You can, the banner settings have the option "Block the page until the visitor decides". It is off by default: a visitor who has to click the banner before seeing the page leaves more often.
What happens to payments and login when a visitor rejects everything?
They work as normal. Login, bookings, payments and form protection are in the necessary category, which the visitor cannot switch off.
How do I hide a category I do not use?
In the banner settings, section "Categories the visitor can choose", untick it. Keep in mind that code assigned to a hidden category never runs.
I run several websites in Calendesk. Does one consent carry over to the others?
No. The decision is stored per address, so a visitor answers the banner on each of your websites separately.
If you are still building your website, start with How can I create a website using the website builder? and How to set your custom domain for your website?