How to offer subscriptions or one-time payments for your customers?
What do you need before you create a subscription-based model in Calendesk?
You need to have an active Calendesk account. If you don’t have an account yet, please go to Calendesk and start your free trial.
Also, you need an integrated Stripe account with your Calendesk account. Please read this article to see how to connect your Stripe account with Calendesk: "Integrations – Account Integrations" if you haven’t done this yet.
How can I use subscriptions in Calendesk?
You have several options to offer for your customers:
Recurring subscriptions – you can create recurring subscriptions for some services you offer. Then, while booking, your customers will be able to pay for a booking using a subscription. Calendesk will track all the subscriptions and disable booking options when there is no available usage.
One-time fee – create one-time fee packages. Instead of recurring subscriptions, how about one-time vouchers?
Offline services – you don’t need to link your subscription with your calendar. Instead, you can use it to charge your users and offer some offline services.
How to add subscriptions to Calendesk?
Please go to the Offer / Subscriptions tab and click the “Add a new subscription” button. A popup will appear.
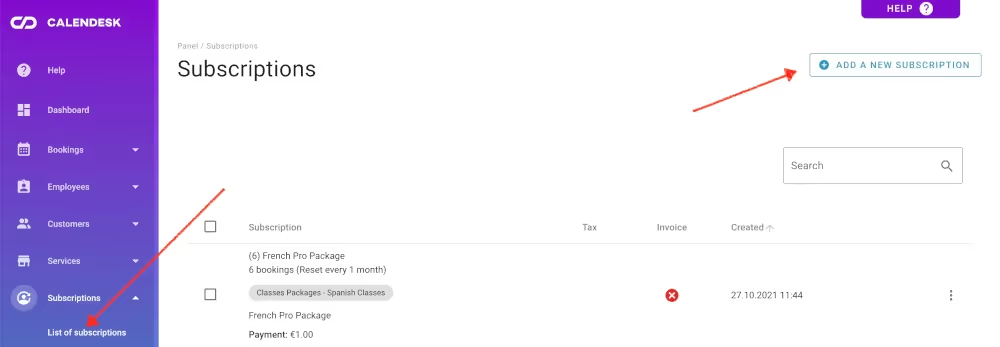
You will need to fill in a few options before publishing a subscription checkout to your customers.
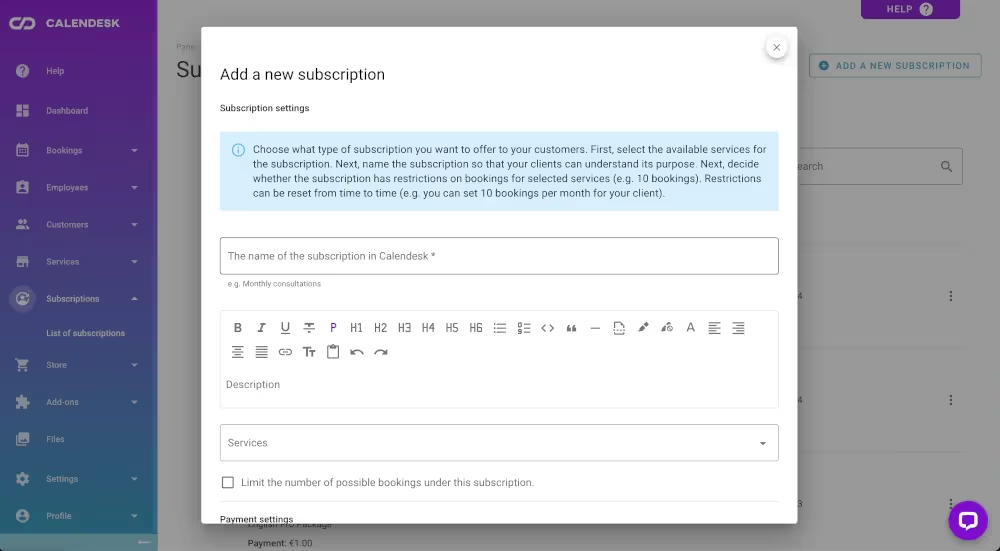
1. Subscription settings
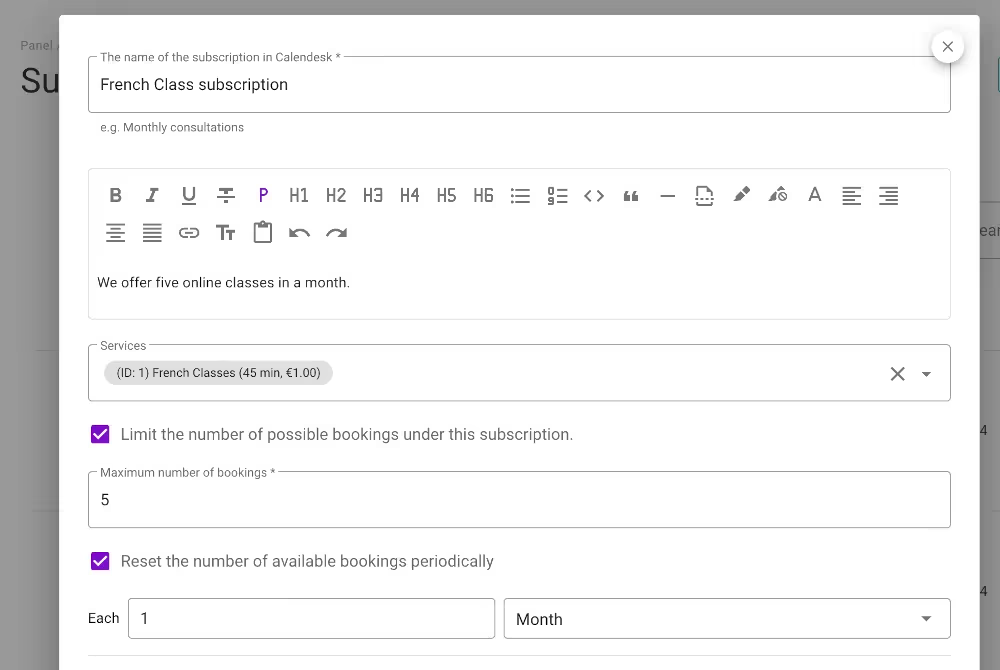
Name/description – name and description are something that your customers will see in the checkout.
Services – decide which services your customers will have access to with this subscription. For example, customers with subscription access will be able to use a subscription as a payment option for a booking instead of paying online.
Service limits – select the option “Limit the number of possible bookings under this subscription.” if you want to limit the subscription usage. For example, you can decide that you want to offer access to your services once a week or five times a month. It’s up to you how you limit the usage, and this option is not related to payment (for example, you can charge once a year or every two days).
2. Payment settings:
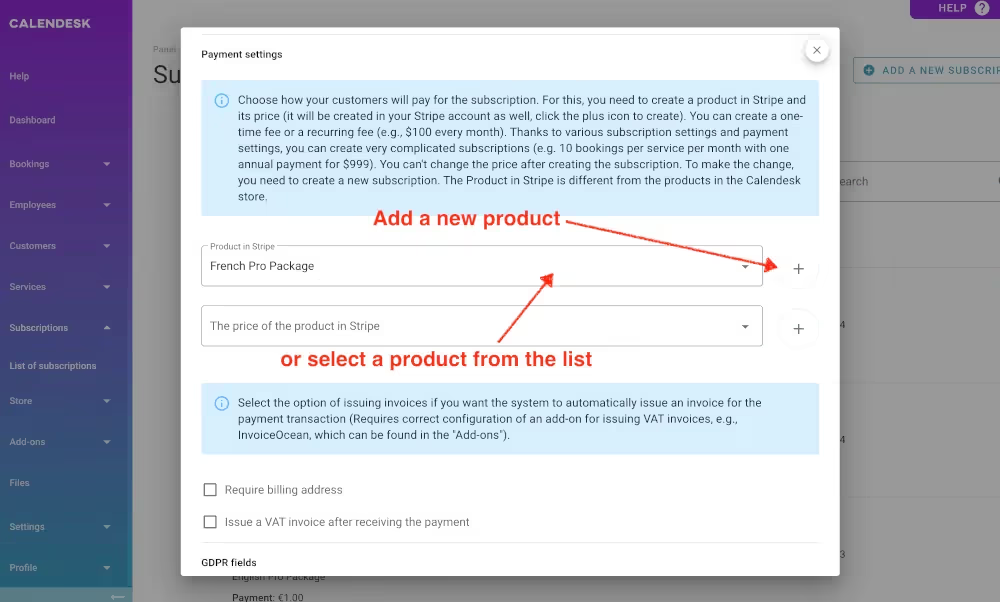
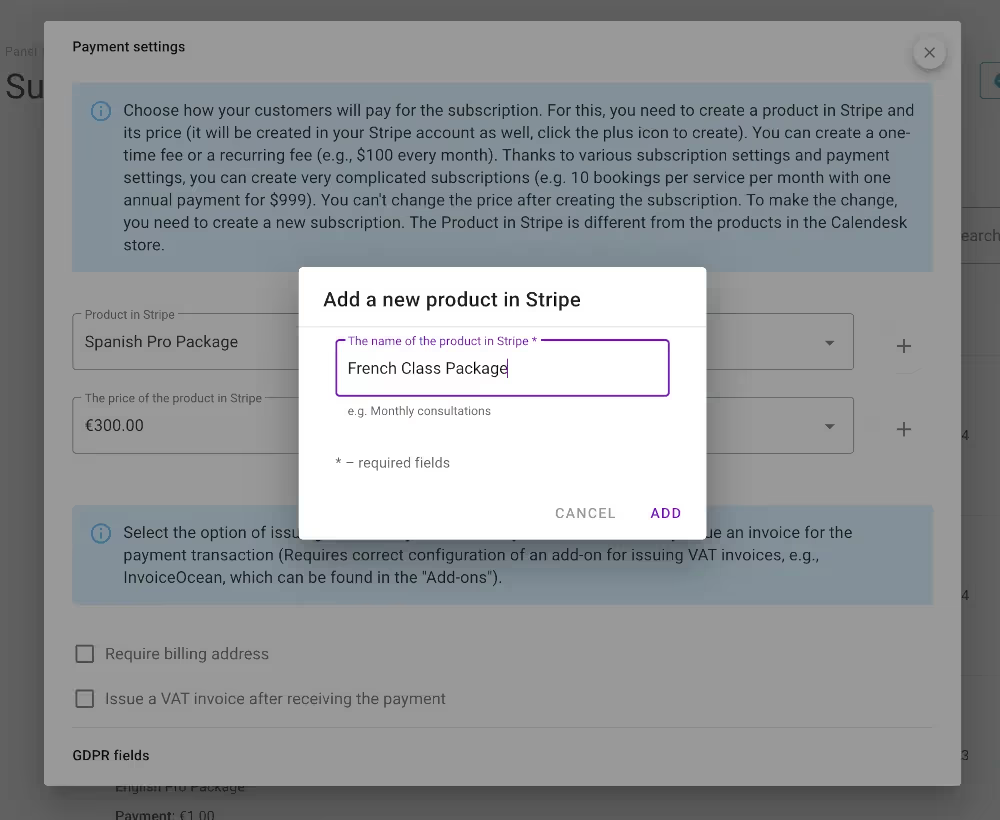
Stripe product – add a Stripe product – choose how your customers will pay for the subscription. For this, you need to create a product in Stripe and its price/prices (it will be created in your Stripe account as well). One Stripe product can have multiple prices that you can use in different subscriptions. So think about a Stripe product as a group of prices.
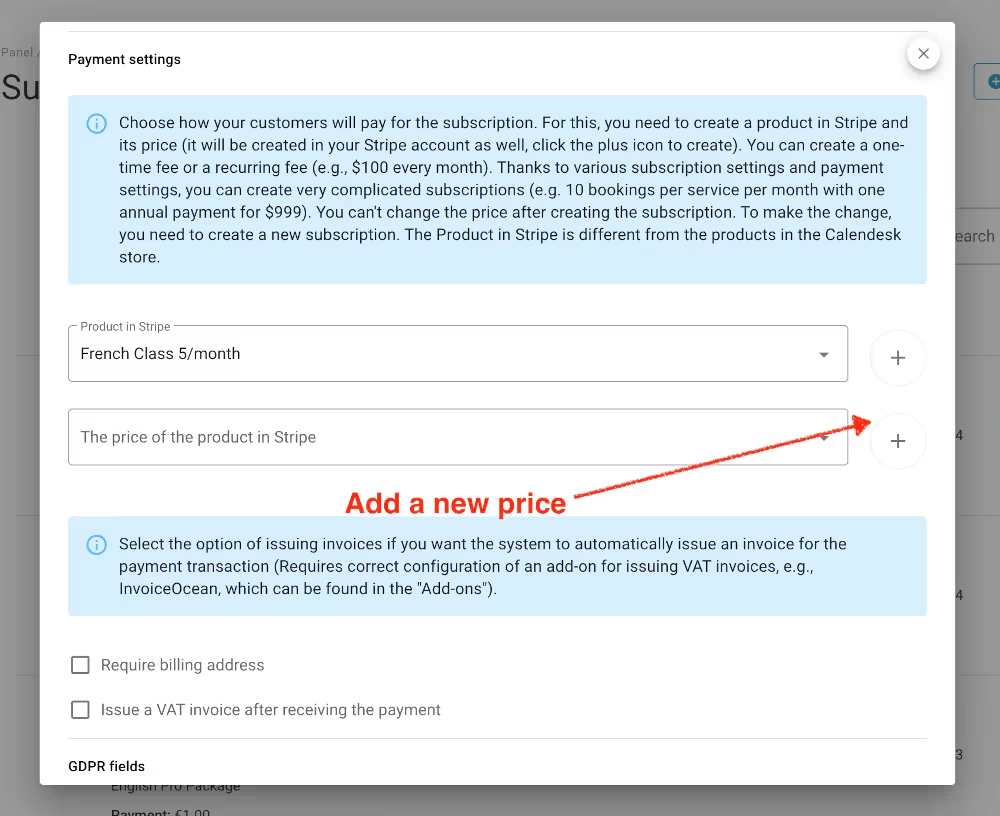
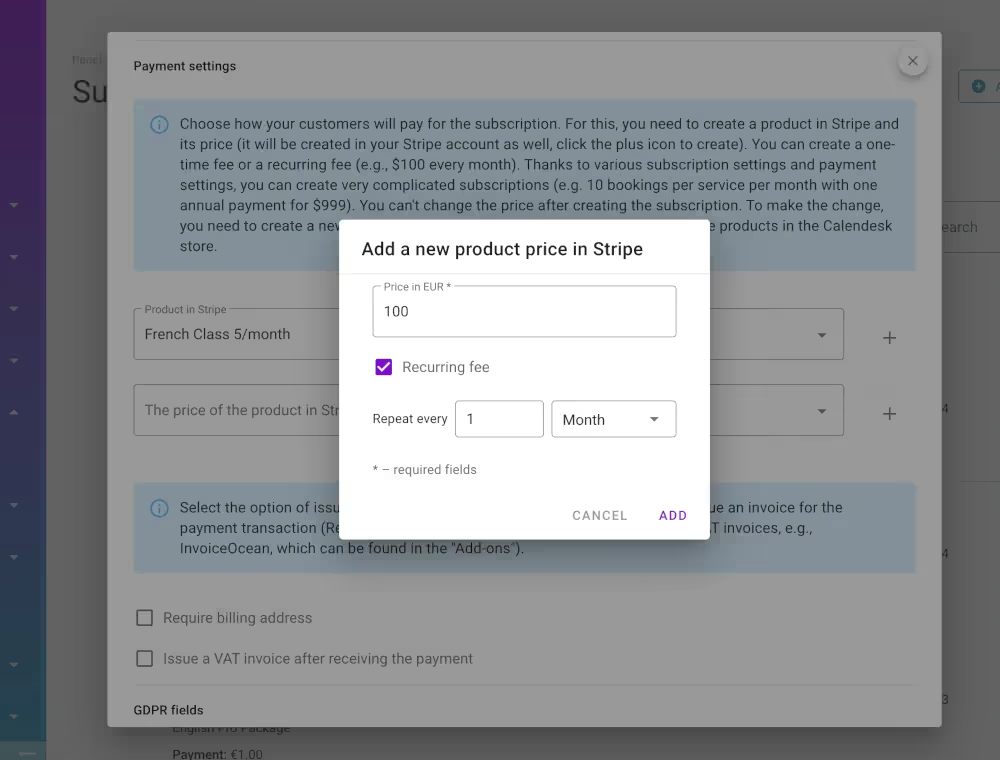
Stripe price – after creating a Stripe product, please add its price. You can create a one-time or recurring fee (e.g., $100 every month). Unfortunately, you can’t change the price after creating a subscription. To make the change, you need to create a new subscription.
3. Additional options
Calendesk subscriptions offer some additional options.
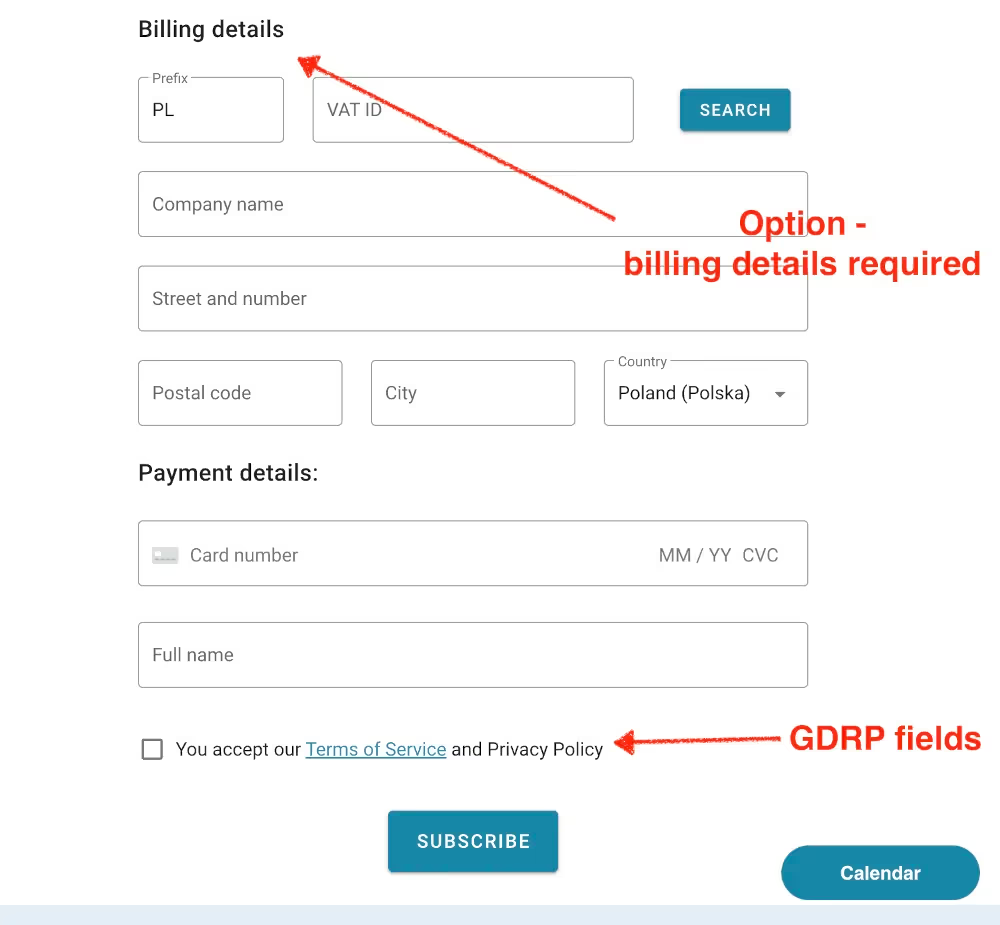
Require billing address – if you select this option, your customers will need to fill in their billing details.
Issue a VAT invoice after receiving the payment – if you use InvoiceOcean integration, you can select this option to issue a VAT invoice right after payment.
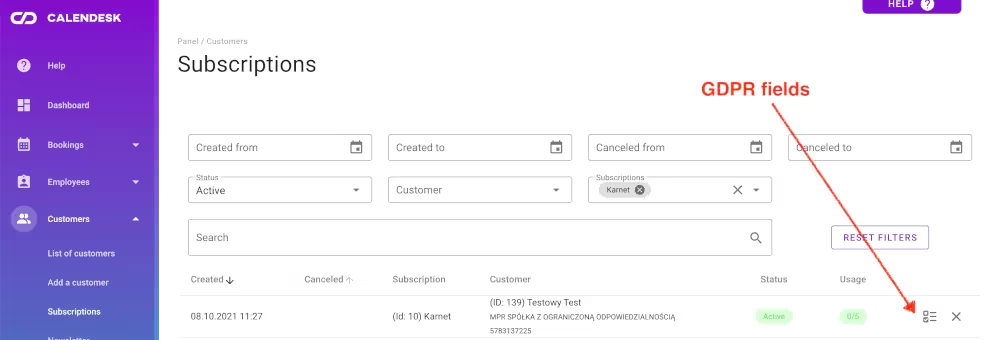
GDPR fields – you can add additional fields that your customers will need to accept before paying for a subscription (term & conditions, privacy policy, etc.).
Redirects – by default, your customers will see just simple success/fail information after purchasing a subscription. However, if you want, you can redirect them, for example, to a special thank you page where you tell them more about your subscription usage.
How to publish your subscription checkout for customers?
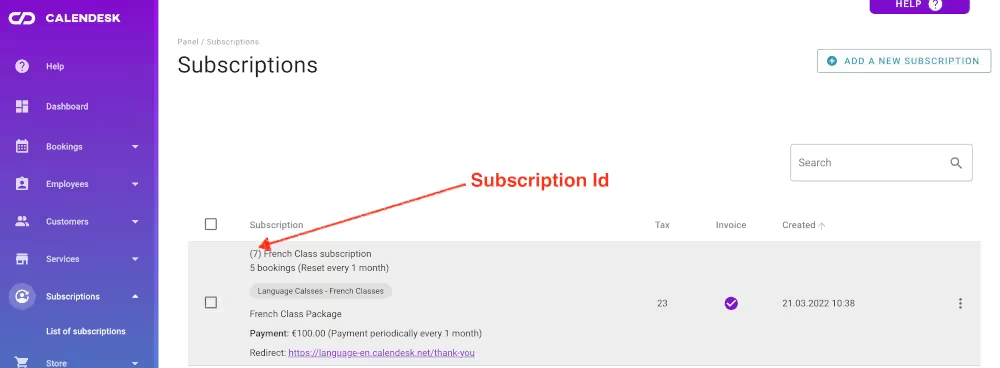
After saving the subscription form, your subscription will be available in the “Offer / Subscriptions” tab. You can redirect your customers to a subscription form (a checkout) using the Calendesk website builder or a direct URL address. If you want to use a direct URL address, you will need a subscription Id to build a URL. Please write it down.
1. Use a website builder
Go to the “Tools / Websites” tab and select the website you want to edit.
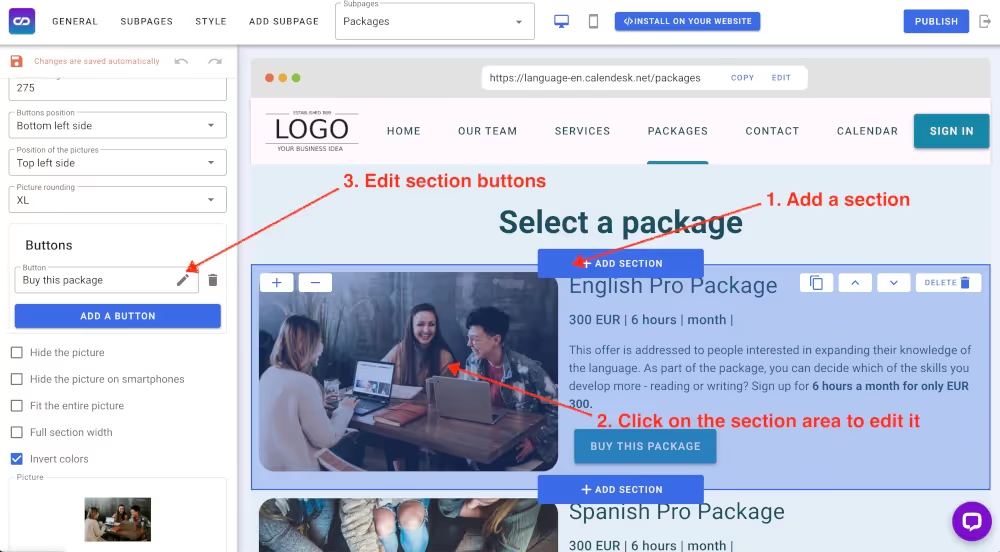
In the Calendesk website builder, add a new section with some buttons.
Click on the added section to display the edit menu on the left side.
Go to the section buttons and click on the pencil icon to edit a button.
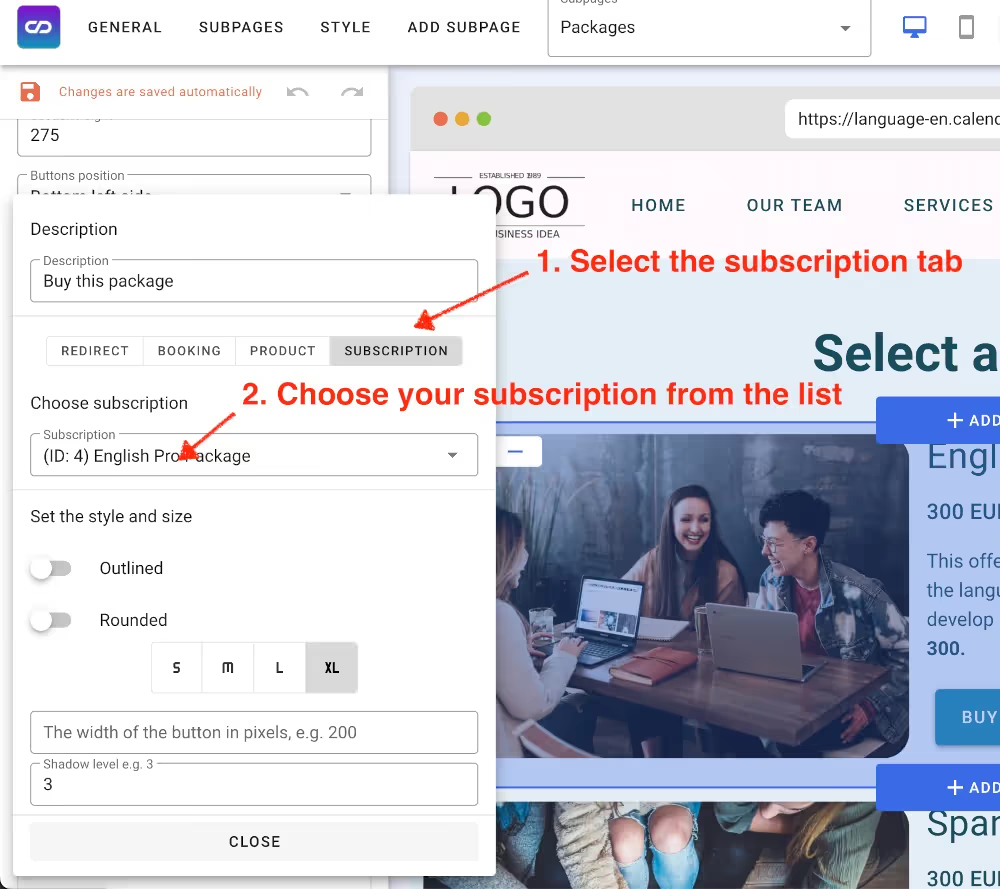
A popup will appear, add some text for the button, click on the subscription tab and select your subscription from the list.
Publish your changes. The button should redirect to the subscription form for your customers.
2. Use a direct URL to the checkout. Build a URL with a subscription Id.
Please go to the list of your websites (Tools / Websites) and copy your website URL.
The subscription form for your customers will be available under your website URL and URL path /subscription/{id}, for example, in our case, we have a subscription Id 7, and the website address is: https://language-en.calendesk.net/. The complete subscription form URL address would be: https://language-en.calendesk.net/subscription/7
What does the subscription checkout form look like?
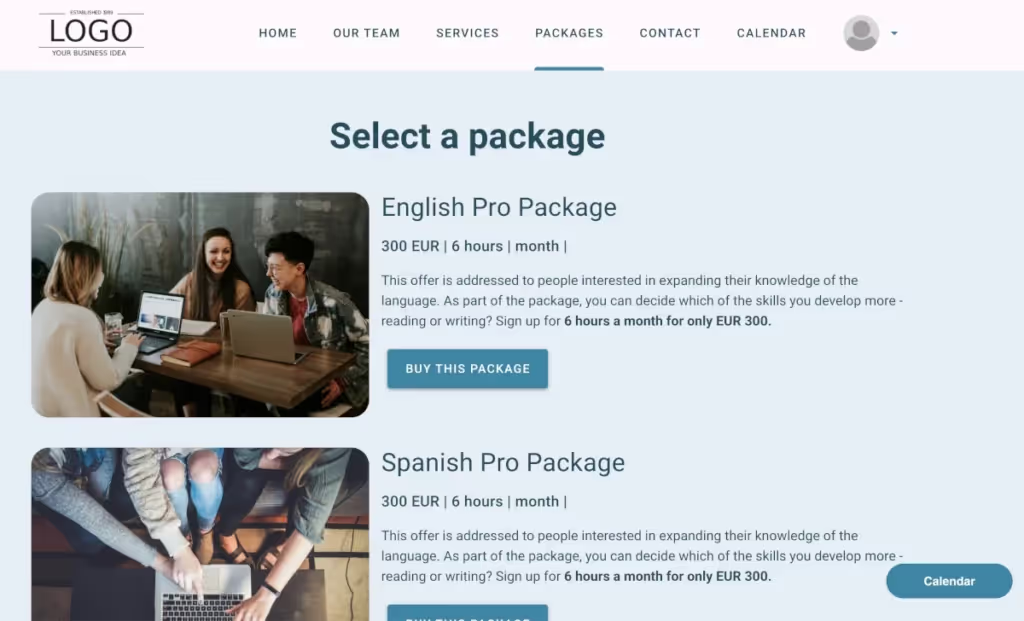
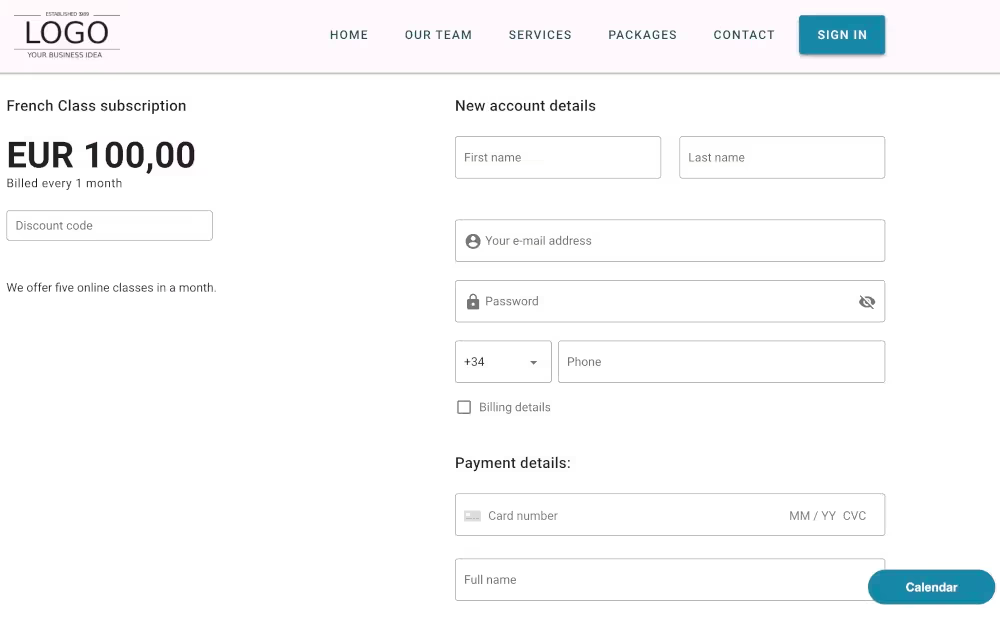
1. An example checkout form with billing every month:
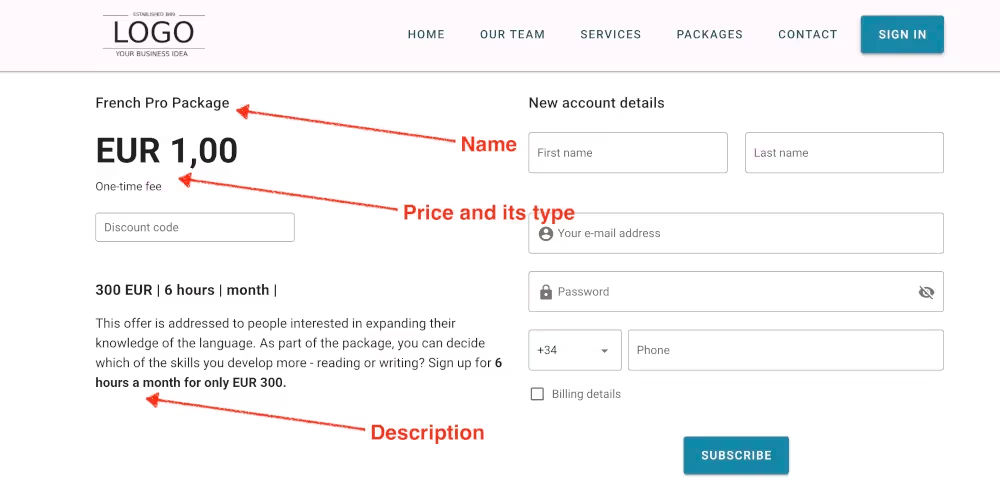
2. An example checkout form with a one-time fee:
What does the booking process look like when paying with subscriptions?
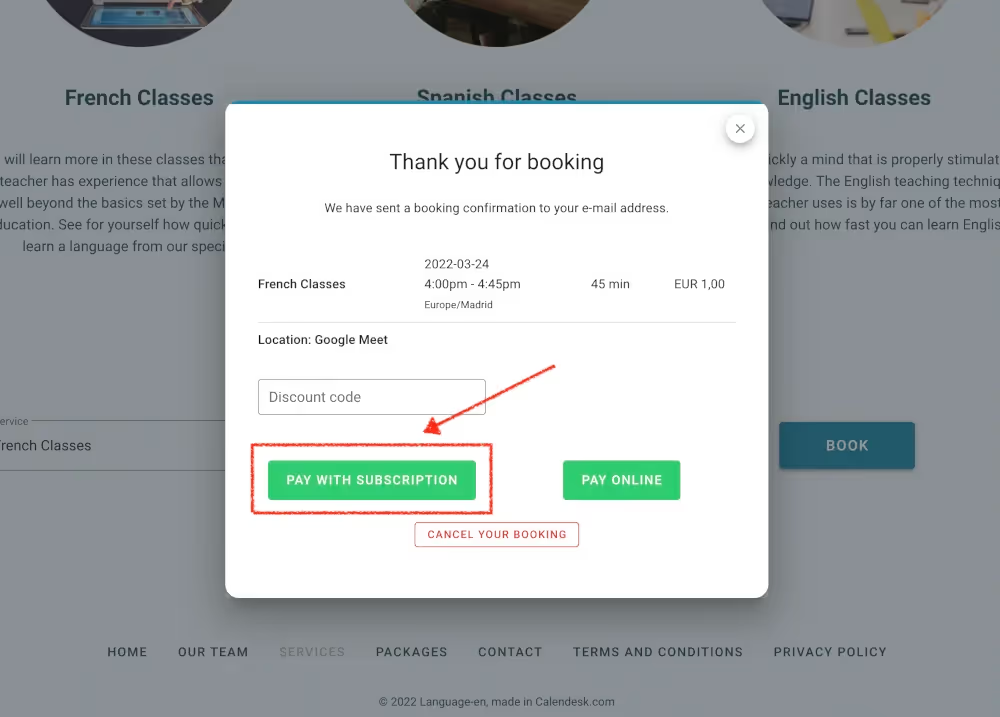
After making a booking in your calendar, your customers with active subscriptions will see an additional button called “Pay with Subscription“. This option will allow your customers to pay for a booking using subscription usage instead of online payment.
Example of paying with a subscription for a booking.
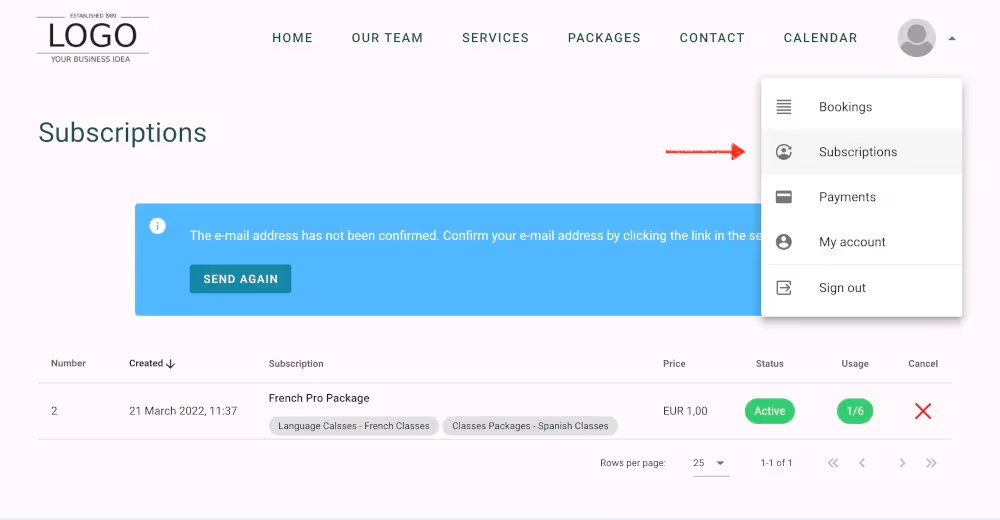
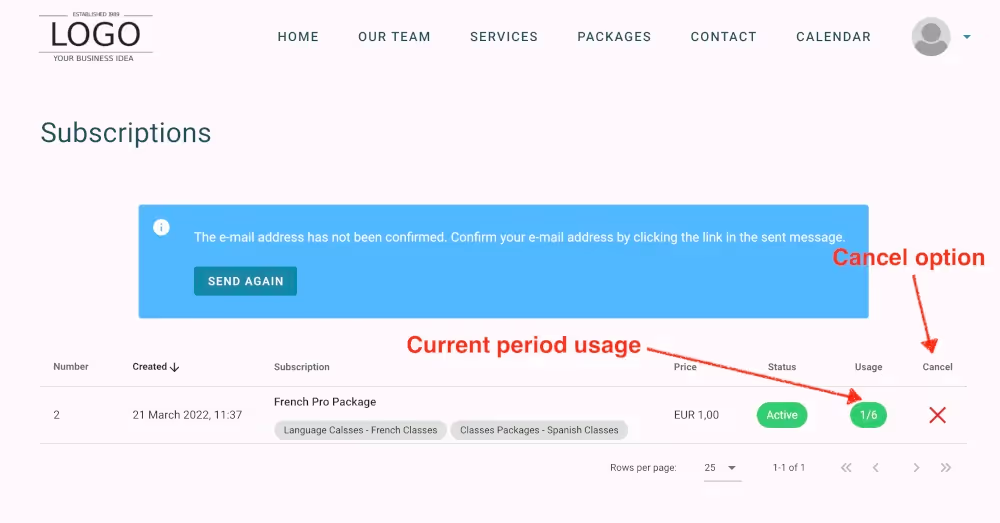
A Subscriptions tab for logged users
If you allow your customers to log in to your website (you can enable it in the Calendesk website builder, in the General tab), they can go to the Subscription tab and see all the details about subscriptions there. They will also see the current usage and the cancel option.
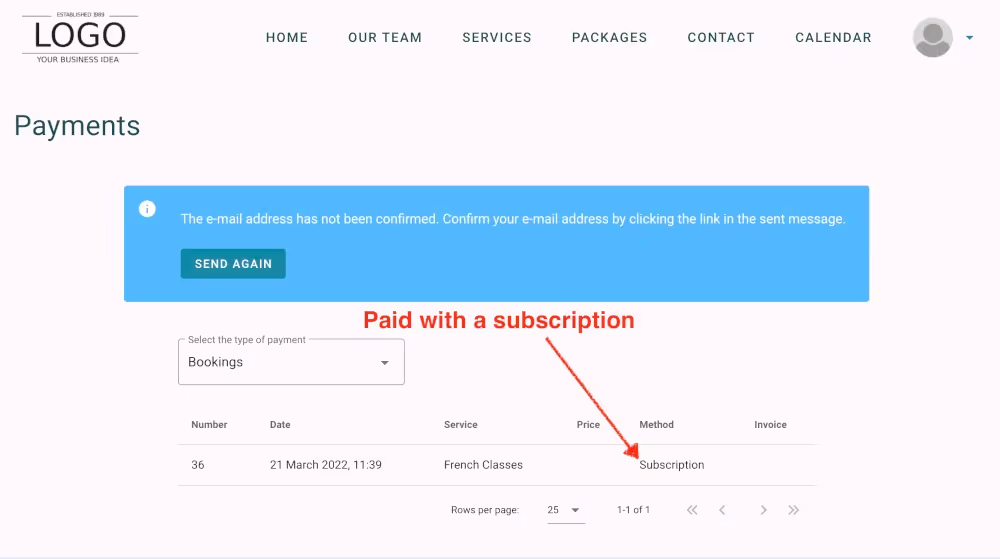
Booking payment history.
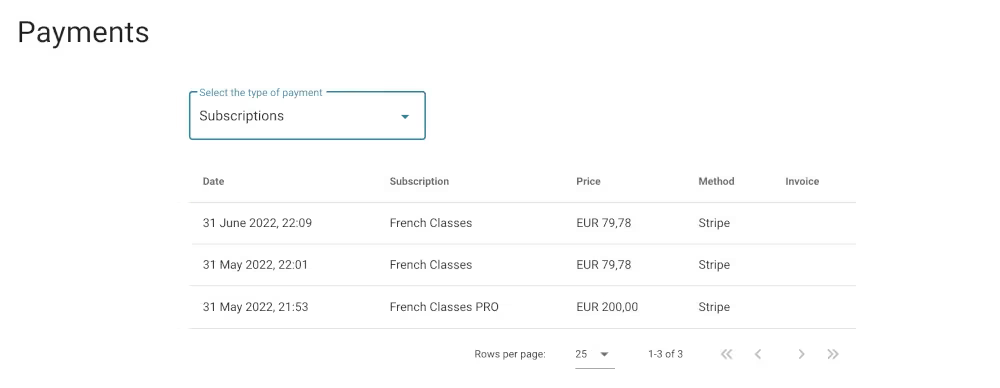
Subscription payment history.
How can I manage customer subscriptions?
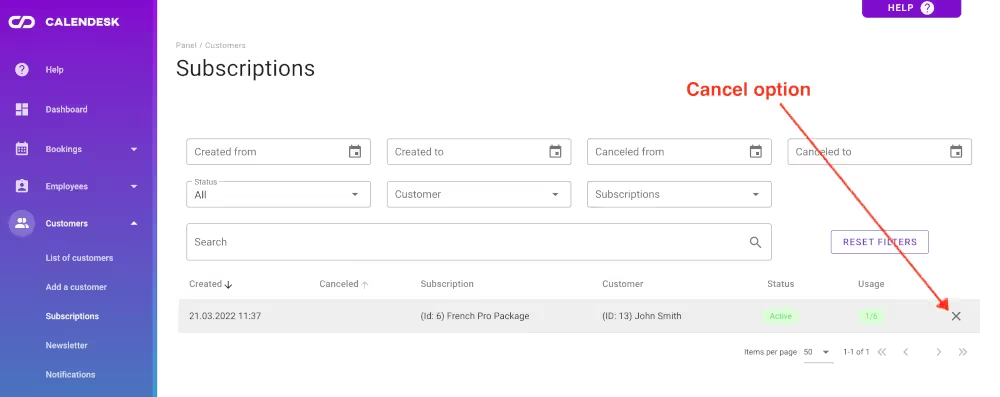
All subscriptions bought by your customers are available in the Calendesk Admin Panel under the “Sales / Subscriptions” tab. Remember that Calendesk is connected to your Stripe account, so all the transactions will be visible there as well.
In Calendesk, you can filter, sort, and manage all your customer subscriptions. On the right side of each subscription, you will see additional options like cancel, delete or show GDPR fields accepted by a customer.
