Recent system changes in Calendesk: the August 2026 release

Website builder
A new calendar and eight settings that weren't there before
This is the biggest block of changes this year. The calendar section is where your clients actually book, and each of the settings below makes that part easier for them.
1. A new calendar section
In the builder's section library you'll find a new calendar section. You add it like any other, and everything described below (the search box, split online locations, booking step order, embedding the calendar on your own website) works in it too.
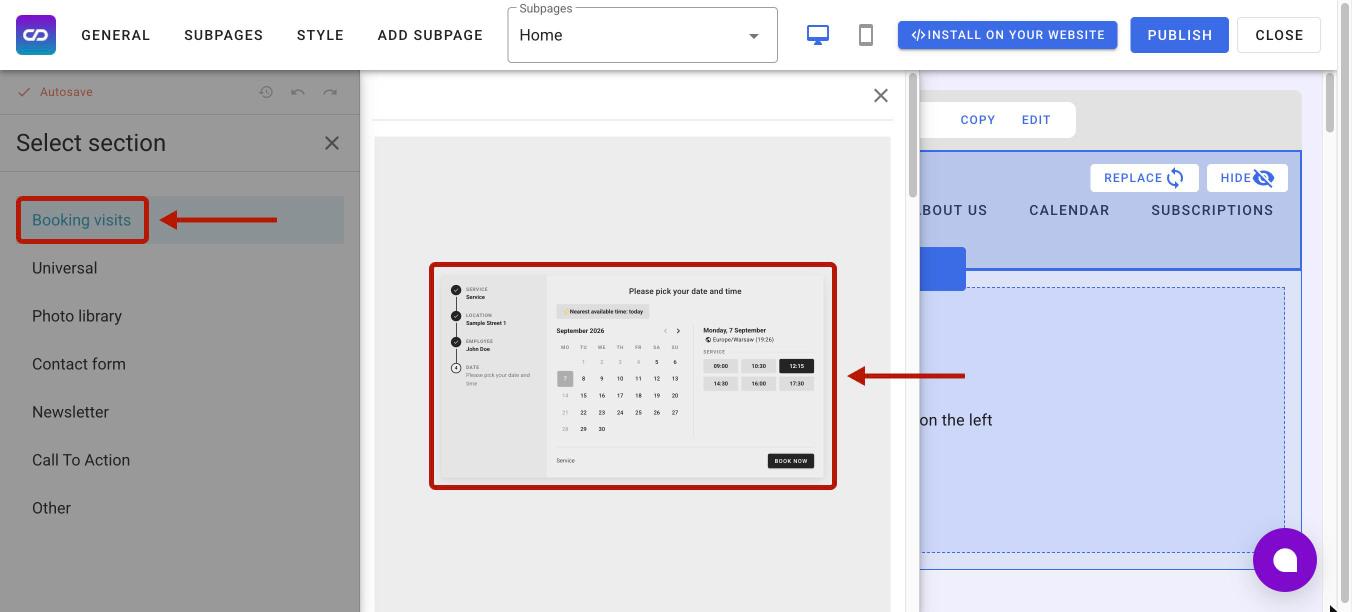
What sets it apart from the other calendar sections is mainly how it displays available slots, plus a panel that lets the client review the steps they've already completed while booking. It's the most compact calendar in our builder.
2. Configuration options grouped into categories
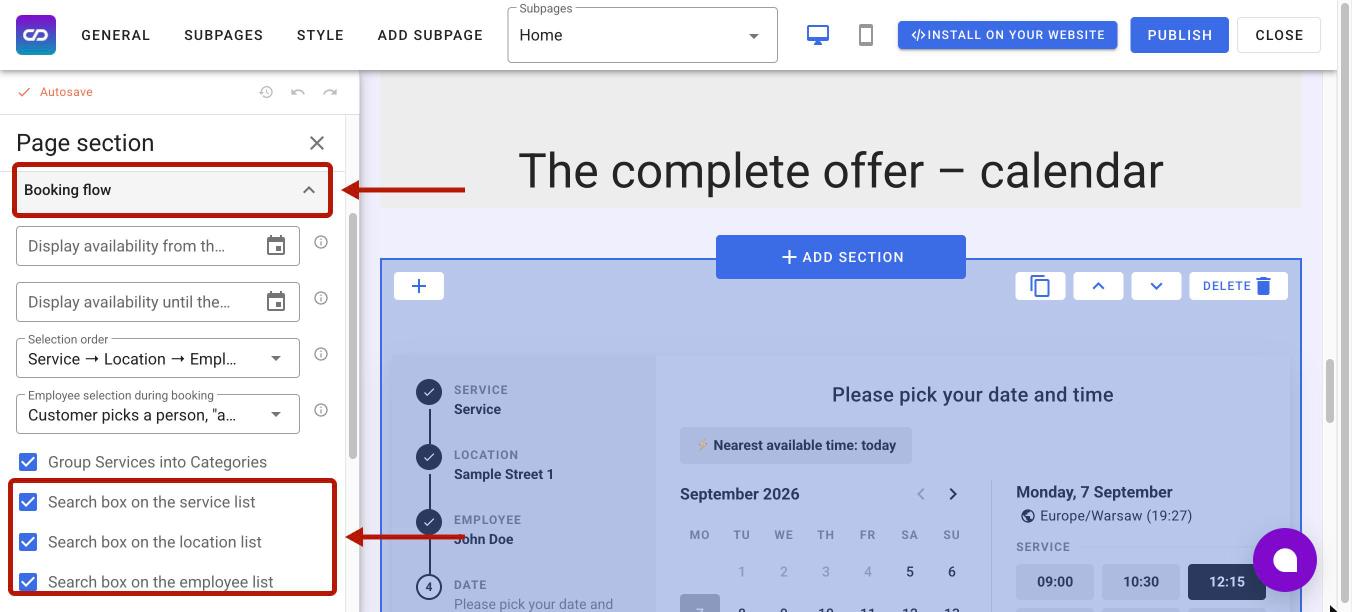
The list of section settings in the builder grew with every release, and scrolling to the end of it stopped being comfortable. Section parameters are now grouped into categories, so you'll find the one you need straight away, without scrolling through the whole library. There's also a handy search box to speed up changes.
3. A search box for services, locations and staff
If you have a dozen or more locations, services or staff members, the client scrolls a long list and gives up more often than they choose. In the calendar section settings you can now switch on a search box: the client types a service name, a city or a staff member's name and moves on.
The setting works per section, so one calendar on your main page can have the search box while another one, on a landing page with a single service, doesn't.
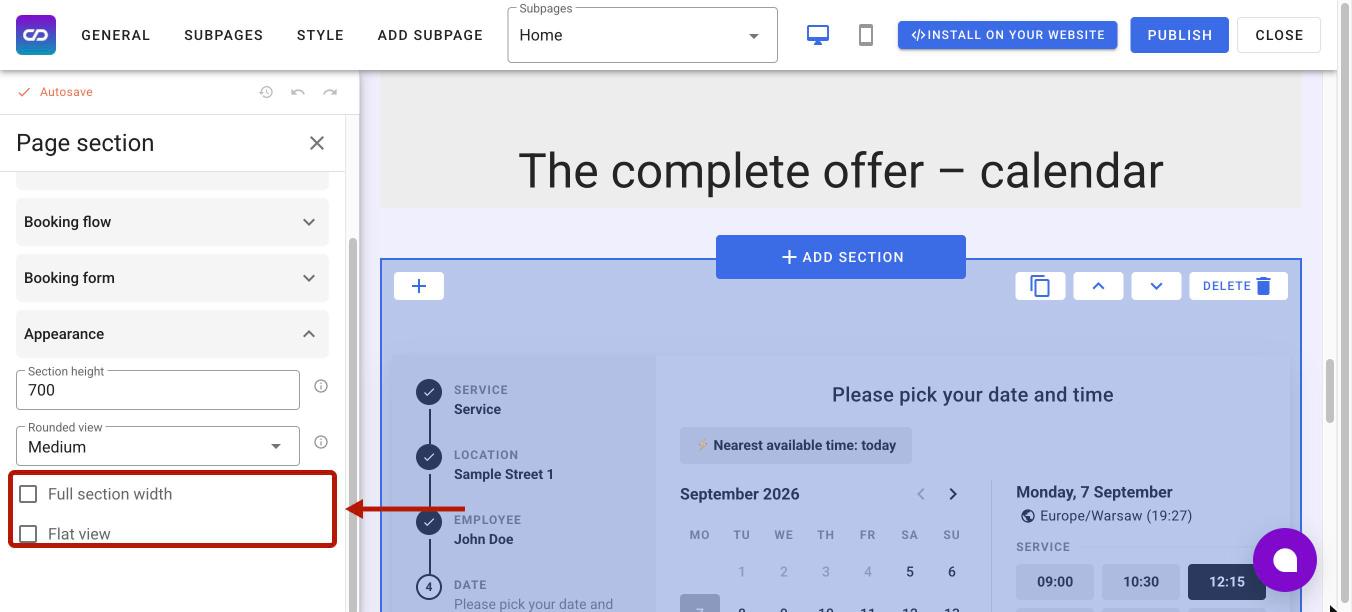
In the calendar section, the "Appearance" category gained two layout options: "Full section width" and "Flat view". The first stretches the calendar across the full width of the section; the second removes its border and shadow, so it blends into your page's background instead of sitting on it as a separate card.
4. Online locations split into individual messaging apps
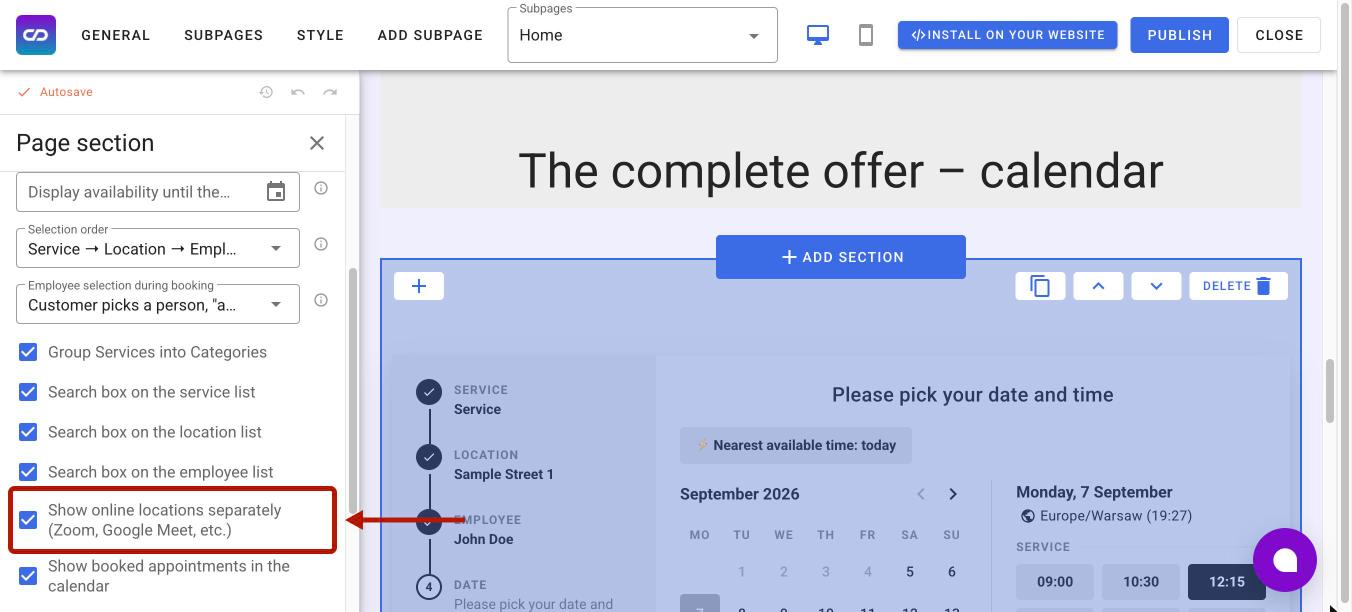
Until now it worked like this: no matter how many online channels you added in the location settings, the system set the first one as the service location. A client booking through the calendar on your website had no choice at all, and you got emails along the lines of "could we do this on Teams instead of Zoom?".
That's over. In the calendar section settings you tick a box that splits the "Online" location into individual channels. The client sees them as separate options and picks the app themselves, before confirming the slot.
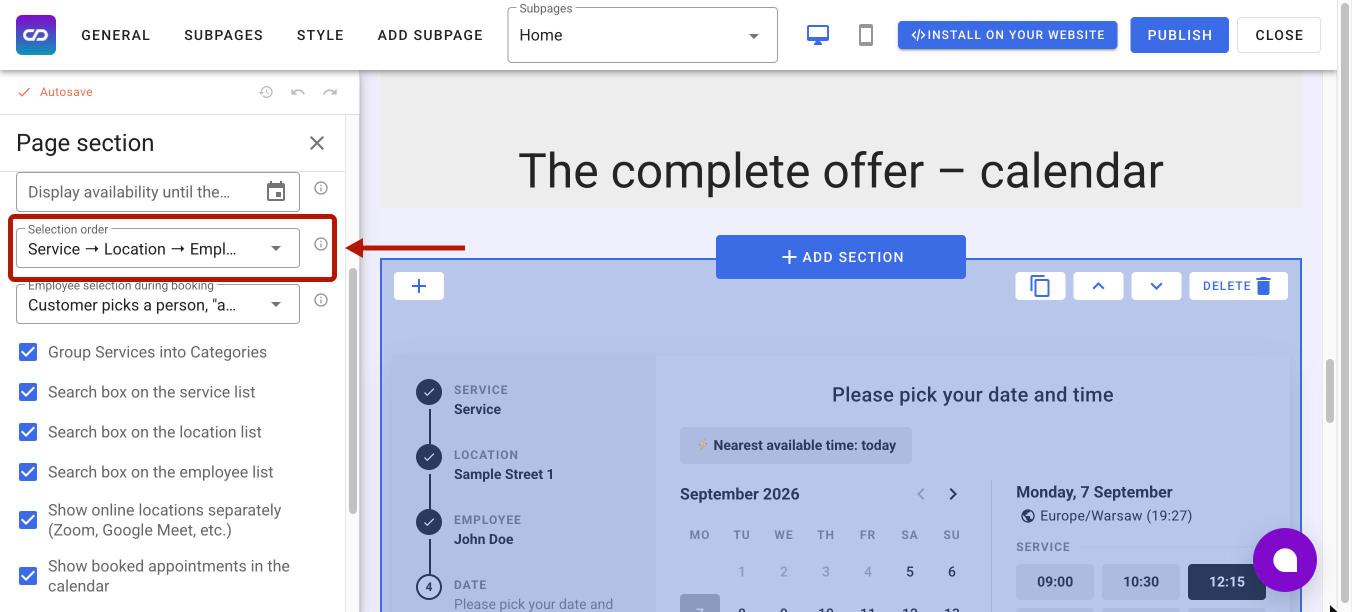
5. Booking step order, six variants to choose from
Not every business starts the same way. A clinic with three branches wants the client to pick the city first. A practice with one location wants to start with the service. A personal trainer wants the client to pick them first.
Now you decide. In the calendar section settings you choose one of six flows:
Service → Location → Staff member
Service → Staff member → Location
Location → Service → Staff member
Location → Staff member → Service
Staff member → Service → Location
Staff member → Location → Service
6. Autosave and going back to an earlier version of your page
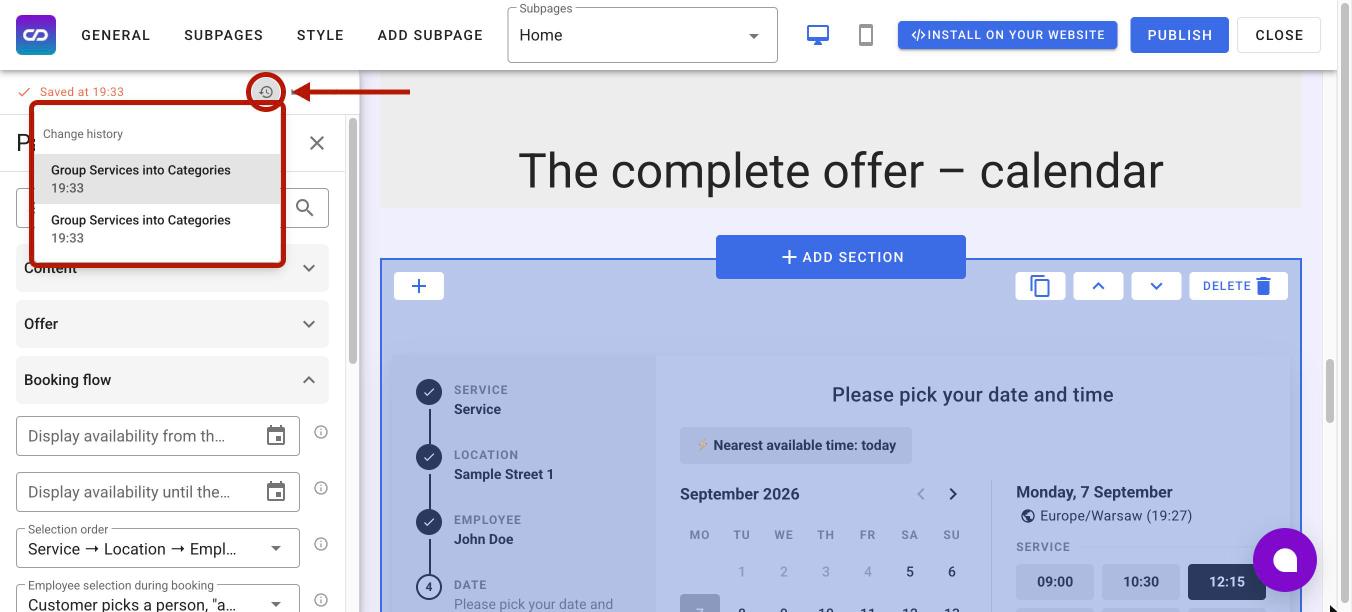
Changes in the builder now save automatically, and every published version stays in the history. Clicked something by accident? The new section layout looks worse than the old one? You go back to the earlier version without rebuilding it by hand.
7. A calendar on your website, even if you didn't build it with us
Until now, generating the code to paste into your own site was a single window with ready-made code. You got the code, pasted it on your site and only then saw the result. Usually a frame inside a frame, with the calendar's white background sitting on top of yours.
We've rewritten the "Embed code on your website" tool from scratch as a full-screen process. You pick one of three ways to embed:
A fixed element, meaning a calendar written into the page content. The client sees it straight away, without clicking anything.
A pop-up from a button, meaning a floating button in the corner of the screen that opens the calendar in a window. You set the button text, the text colour, the background colour and the bottom corner it sits in.
A pop-up from a link, meaning an ordinary link in your text that opens the same window when clicked.
On the left you set the details; on the right you see a preview on a mock browser window. The preview is clickable, so you can walk through a booking exactly as your client will, before you paste anything on your site. For the fixed element you choose whether the frame adjusts its height to the content (then you only set a maximum width) or has fixed dimensions in pixels.
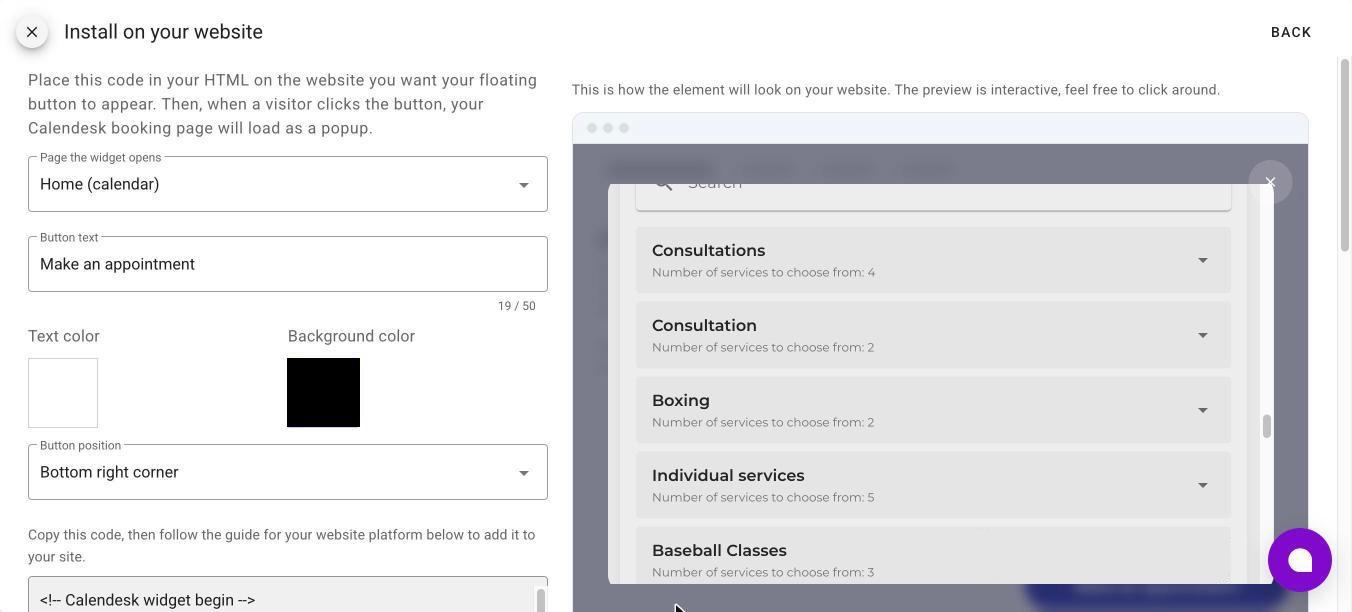
There's also a new picker for the page the widget opens. Pages that actually contain a calendar section come first on the list, marked "(calendar)". If you pick a page without a calendar, you get a warning instead of silently pasted code that does nothing for your client.
8. Instructions for the exact website builder you use
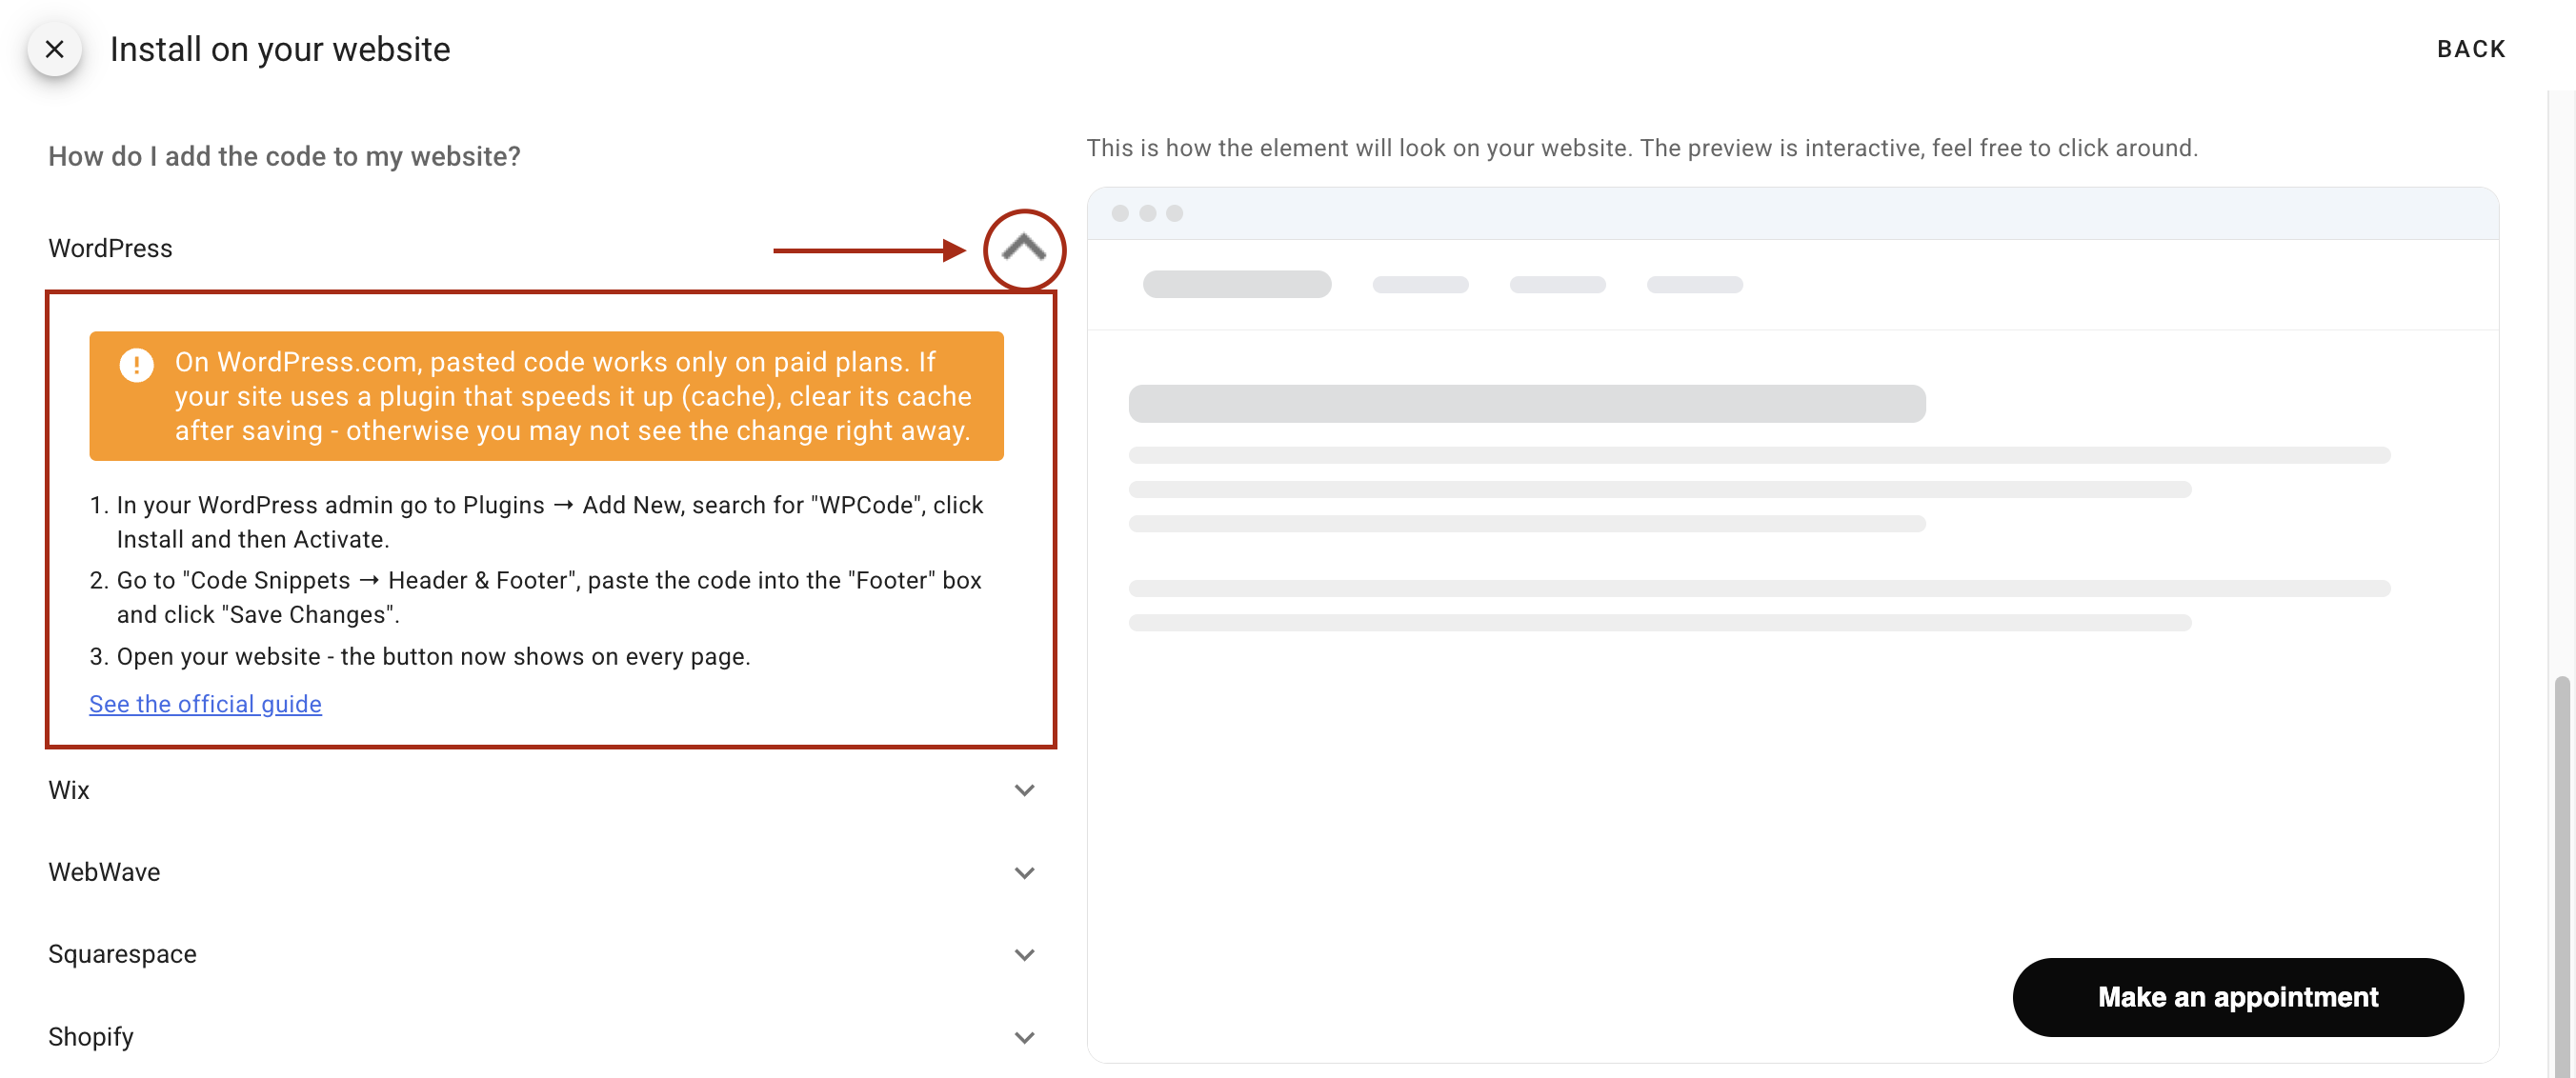
Below the code there's an expandable list of instructions for eight scenarios: WordPress, Wix, WebWave, Squarespace, Shopify, Google Sites, Jimdo and "Other website". Each one is a set of numbered steps written without jargon, plus a link to the platform's official documentation.
Availability schedules
Plan in periods, not "from today, forever"
The second big area of changes. You'll find availability schedules in the panel under the Availability schedules tab, and also from Employees and Offer – Services.
9. Several schedules per staff member, each with its own validity period
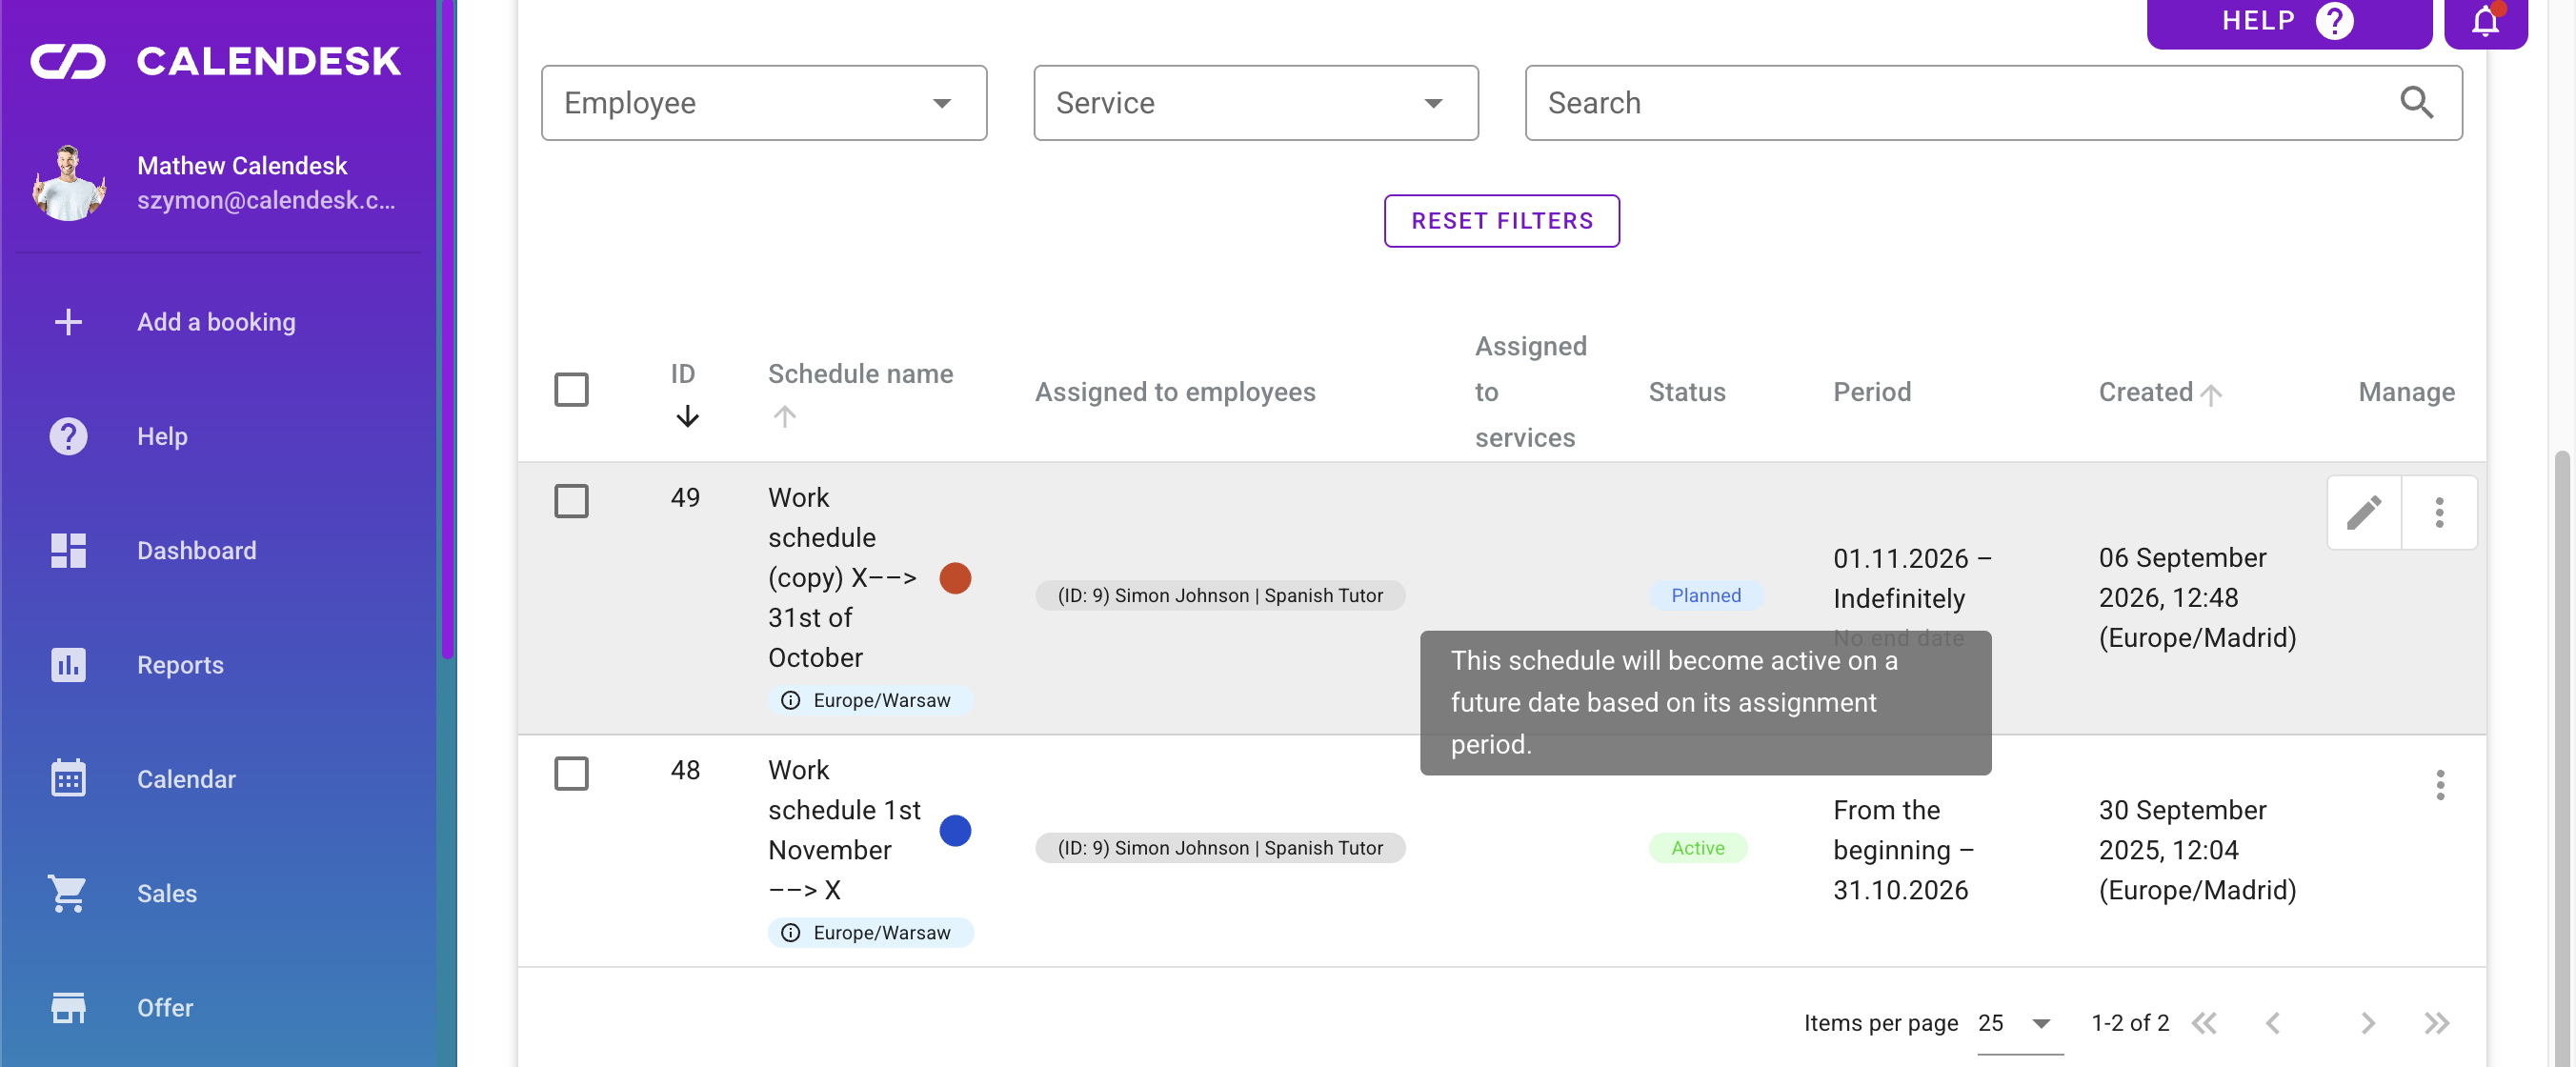
Until now, changing working hours for July and August meant manually switching the schedule over on 1 July and switching it back on 1 September. Now you assign several schedules to one staff member or one service at once, and give each of them an active period.
A holiday schedule for July and August, a standard schedule for the rest of the year, a festive schedule for two weeks in December. You set it up once in January and the system makes sure clients book according to your availability for the whole year.
10. Exceptions can now cover a whole service category
When adding an exception to an availability schedule, you can now pick an entire service category instead of clicking services one by one. If you have a "One-to-one sessions" category with twelve services and want to switch them all off on a Friday, you do it with one click, not twelve.
Adding a new service to the category later doesn't mean going back to the exceptions either.
11. Exceptions pull hours from your standard working week
The "Exceptions - dates overriding weekdays" section overrides the settings from your standard working week. In practice, though, most exceptions are an ordinary working day with one small difference: you work as usual but finish two hours earlier.
So after you pick a date from the calendar, the system now fills in the hours from the matching day of your standard week. Instead of building the day from scratch, you change one hour and save.
Calendesk in Claude AI
12. An AI agent for every staff member
The Calendesk connector for Claude AI plugs your panel into the chat. It's not an admin-only feature: any staff member with access to the Calendesk panel can connect.
How to connect it
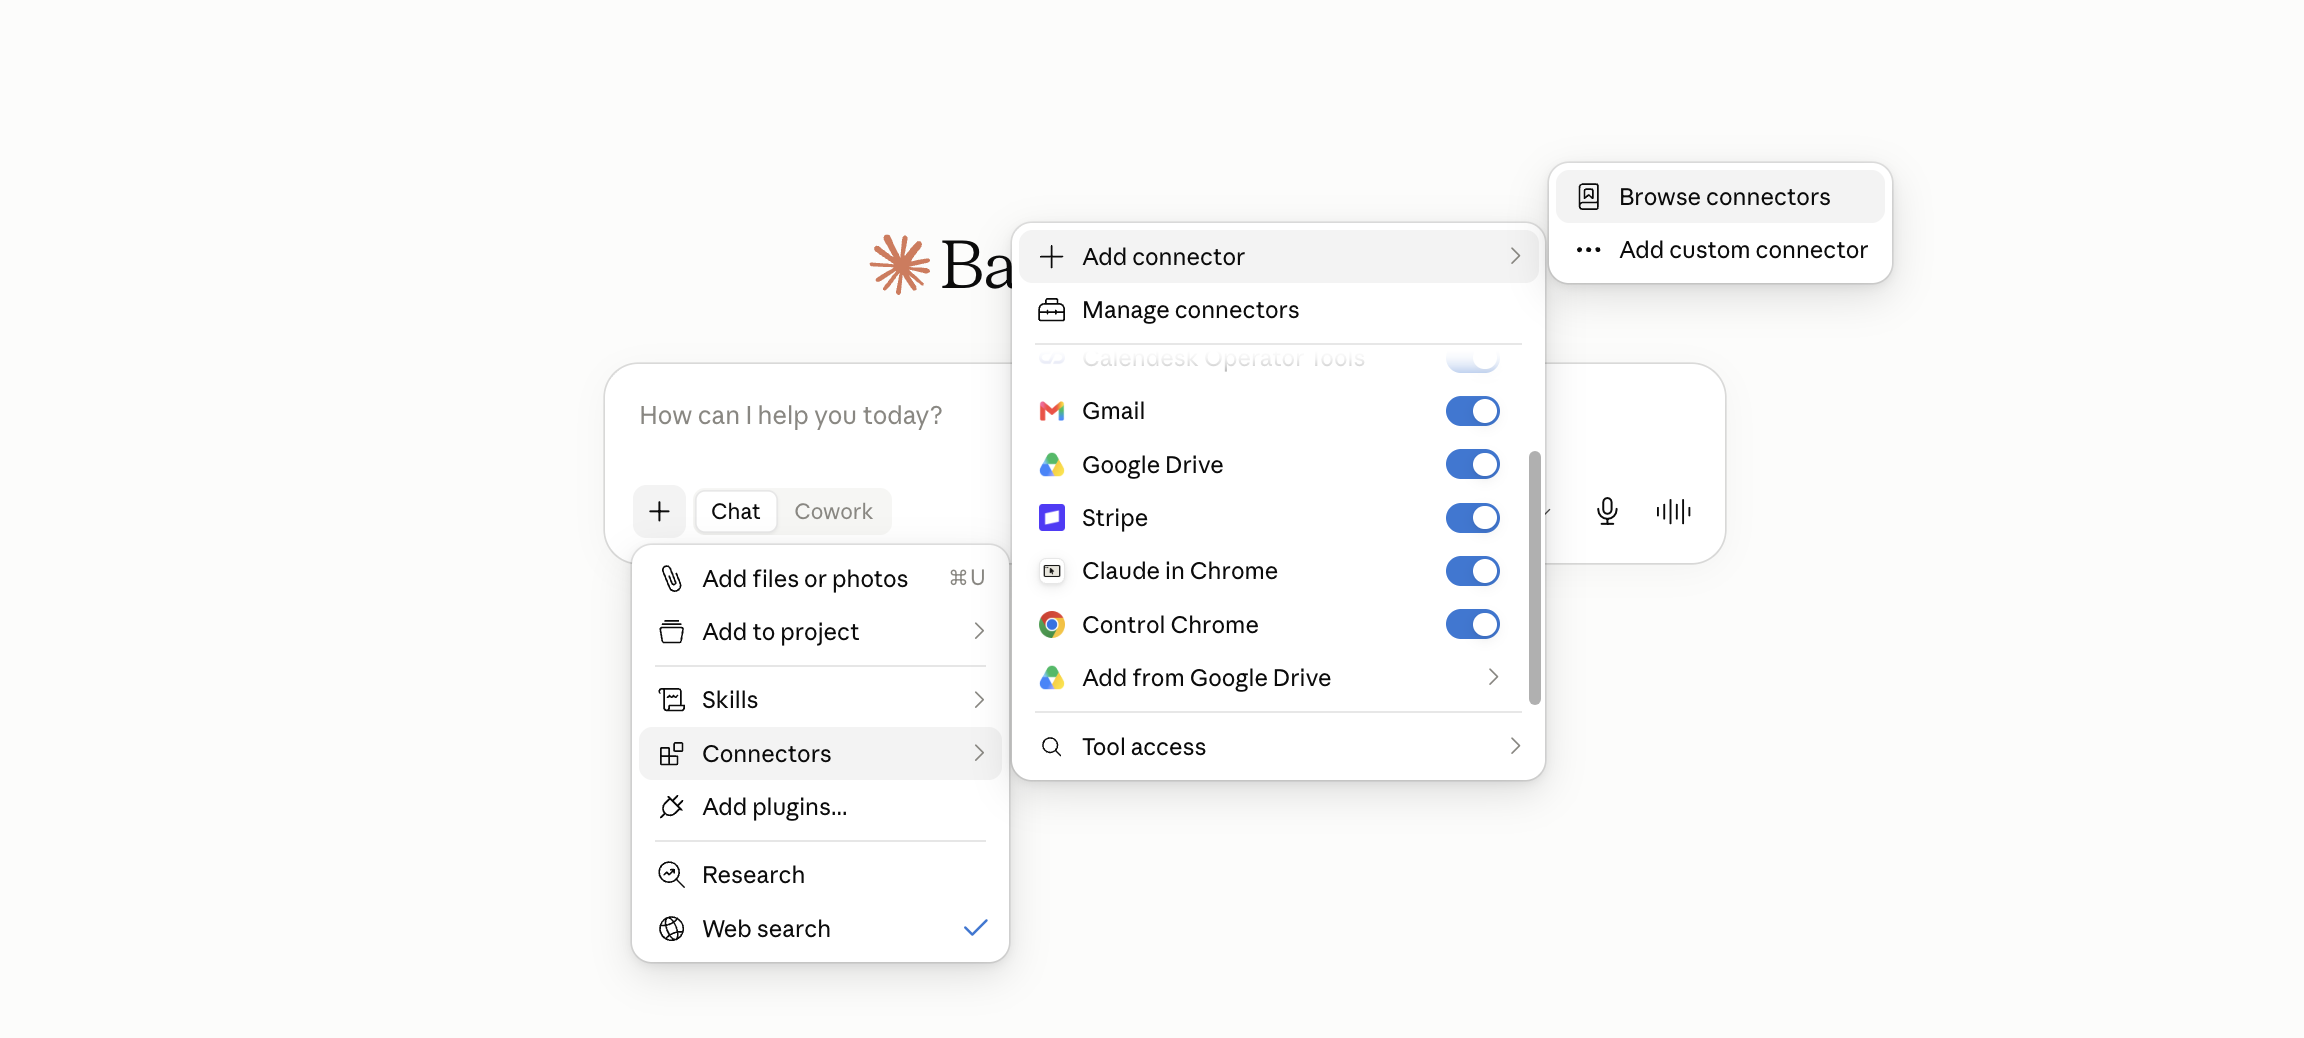
A staff member adds the Calendesk connector in their own Claude account settings and logs in with their Calendesk credentials. The same ones they use at admin.calendesk.com. Nobody hands a password to anyone; everyone connects on their own.
The connector sees exactly as much as the staff member does
This is the most important part. After logging in, the connector recognises who's writing and works with that person's Calendesk permissions. A Restricted employee will see their own bookings and their own blocked slots in the chat. A Trusted employee will see the whole team's bookings and the client base. Managers and Administrators will see everything else.
So you don't have to raise anyone's permissions to give them Claude. Connecting the connector doesn't throw anything wide open.
What a staff member can simply type
Instead of clicking around the panel, they type in the chat:
"What's on my schedule tomorrow?"
"Find a free slot for a consultation on Thursday after 3:00 pm"
"Book Anna Kowalska in for Friday at 10:00 am"
"Move Mr Marek's appointment from Tuesday to Wednesday morning"
"Block out my Thursday afternoon, I'm off to a training course"
"Give me the phone number for Ms Nowak"
"How many bookings did I take last month?"
Claude does it in the Calendesk account and shows the result. The people who gain the most are the ones who don't sit at a computer for most of the day: a therapist between sessions, a trainer on the gym floor, a technician on the road.
Panel on your phone
The hamburger menu has moved to the bottom
13. A bottom bar instead of the hamburger menu
We've moved the navigation to the bottom, like in mobile apps. The top bar is now clean, and the bottom one puts five things within thumb's reach:
Menu, which slides out the full panel menu,
Calendar,
A plus in the middle, picked out in colour, which opens the new booking window,
Sales,
Clients.
These are the four tabs people open most often in the Calendesk panel on a phone, plus a way into everything else. A new booking is now one tap from anywhere in the panel, not three.
Calendesk panel
14. New spots in the panel now get an arrow
The problem with an update announced in an email that changes fifteen things at once is that nobody reads about them in the newsletter, and half stay undiscovered.
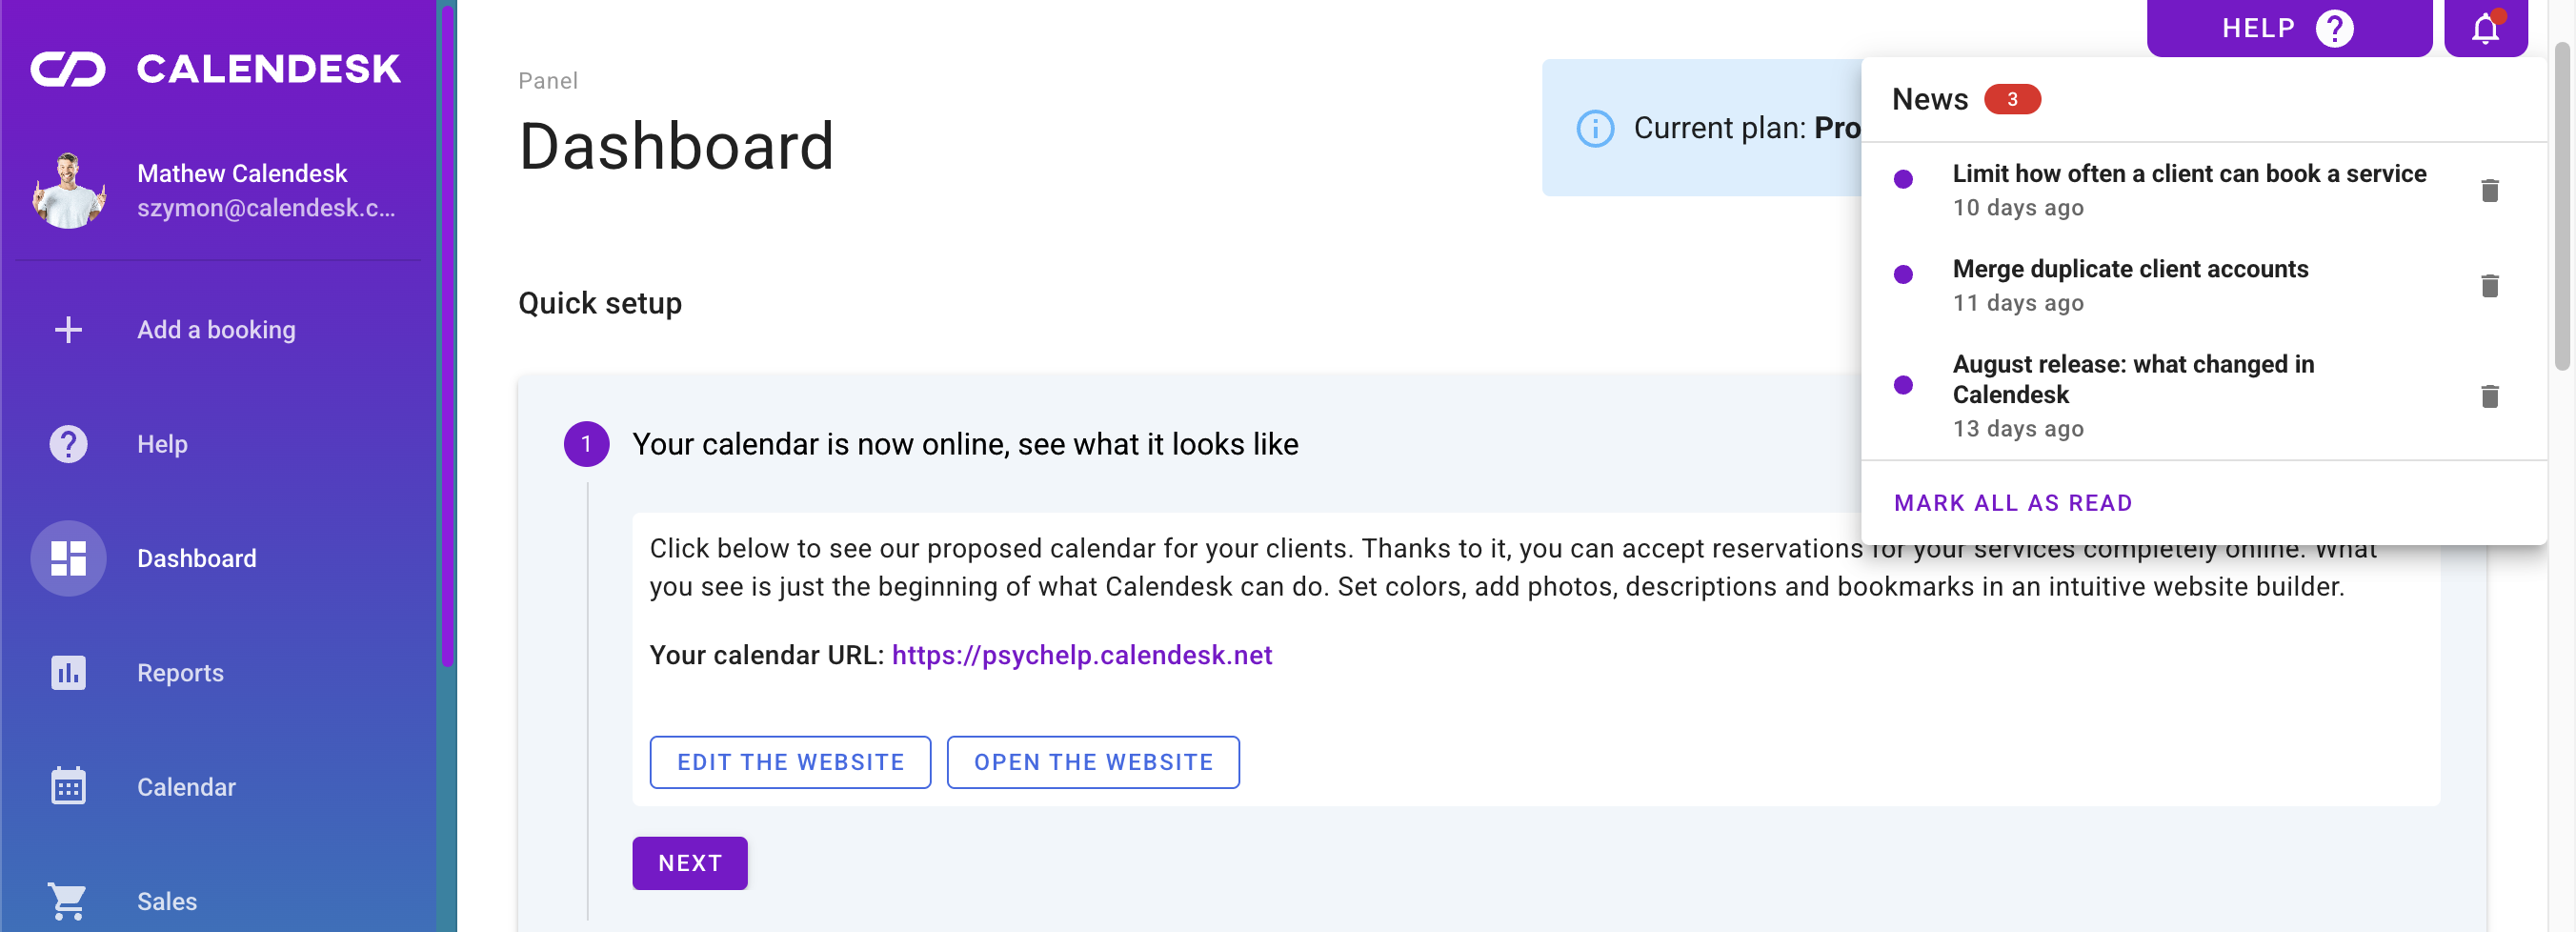
So new spots in the panel now get a small card with an arrow pointing at that exact place. It says what's changed and has one button: "Got it". You click and it's gone for good.
Three things we did on purpose. The card has no close cross and won't dismiss when you click elsewhere, so you can't shut it by accident without knowing what was in it. The dismissal is stored on your account, not in browser cookies, so the card doesn't come back when you switch to your phone or clear your history. And each staff member has their own: you clicking it away doesn't take the hint from your team.
The card also waits until the feature it points at is ready to use, so it won't flash on an empty screen.
Right now you'll see two: by the news bell in the top right corner and by the new bottom menu on your phone.
The system now speaks French, and colours you can actually tell apart
15. Every staff member sets their own panel language
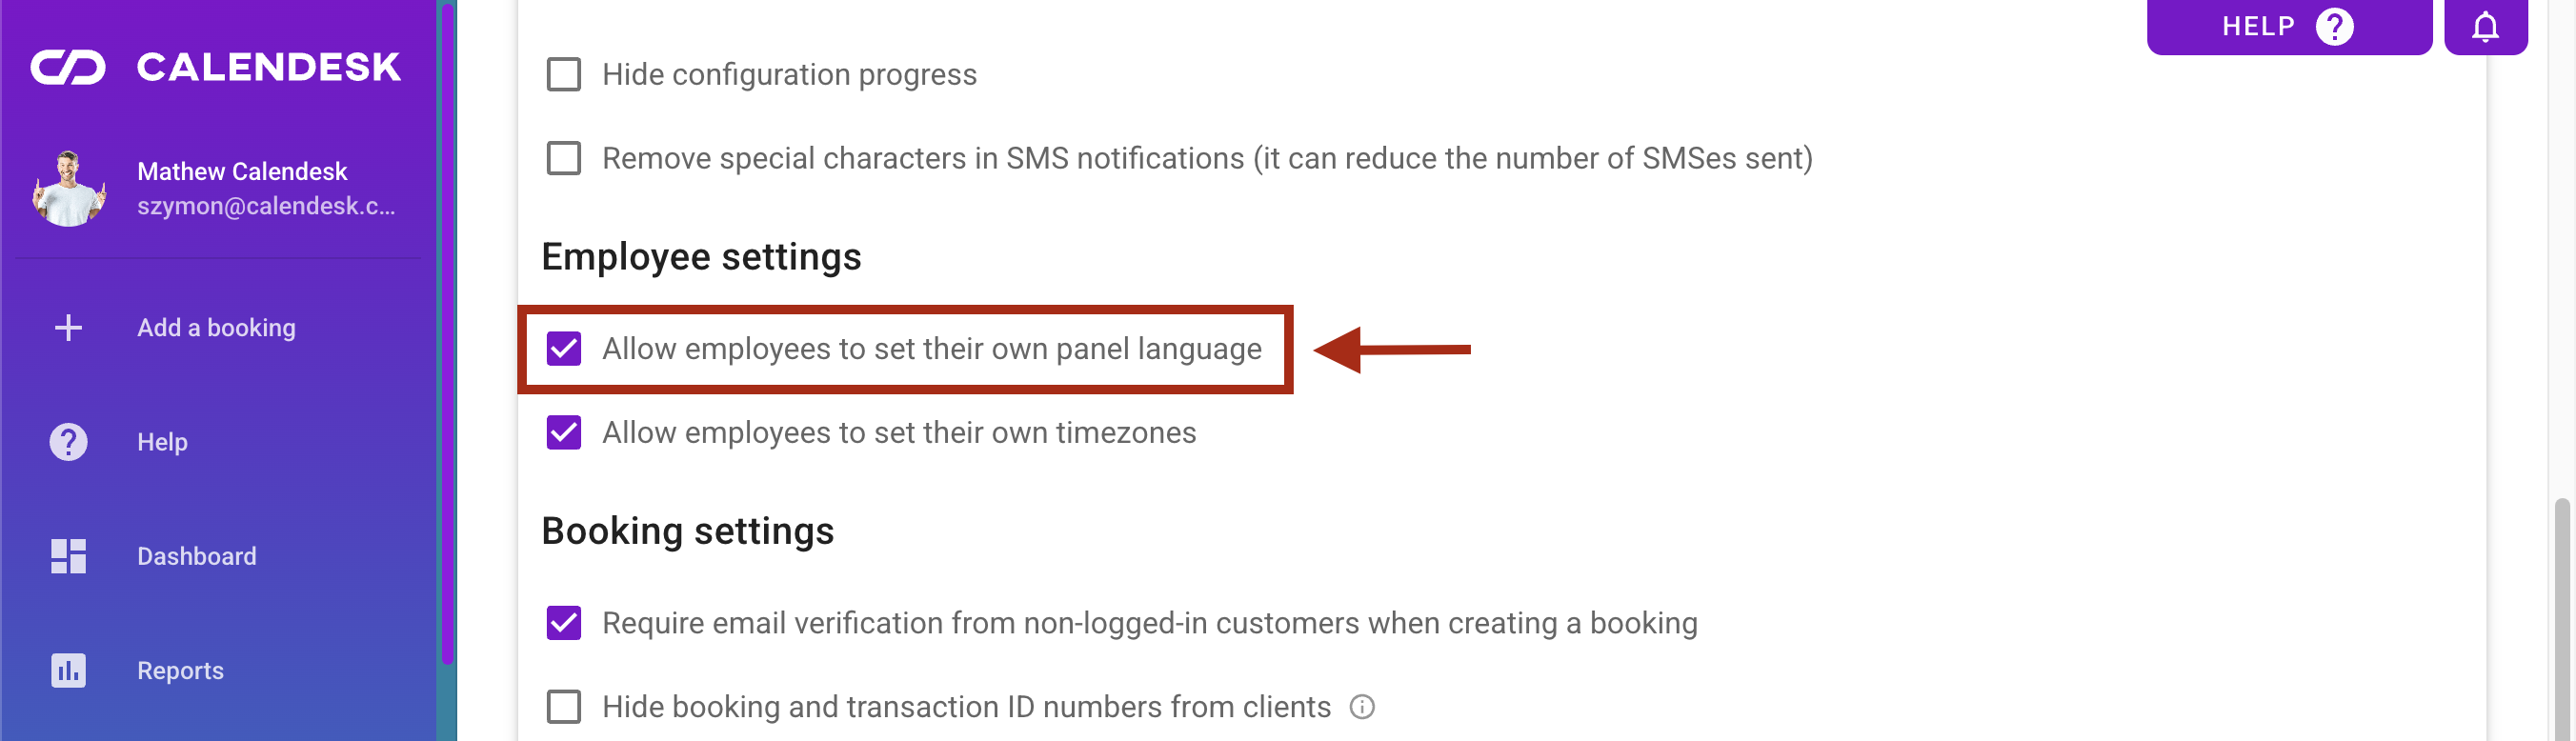
The whole platform is now available in French. A staff member sets that language on their own account, independently of the administrator's account language, so the French-speaking part of your team works in French while you keep your own panel language.
There's one condition: the administrator has to allow it. You do that in the Employees tab, in the person's profile, in the same section where you grant panel access and set the permission level.
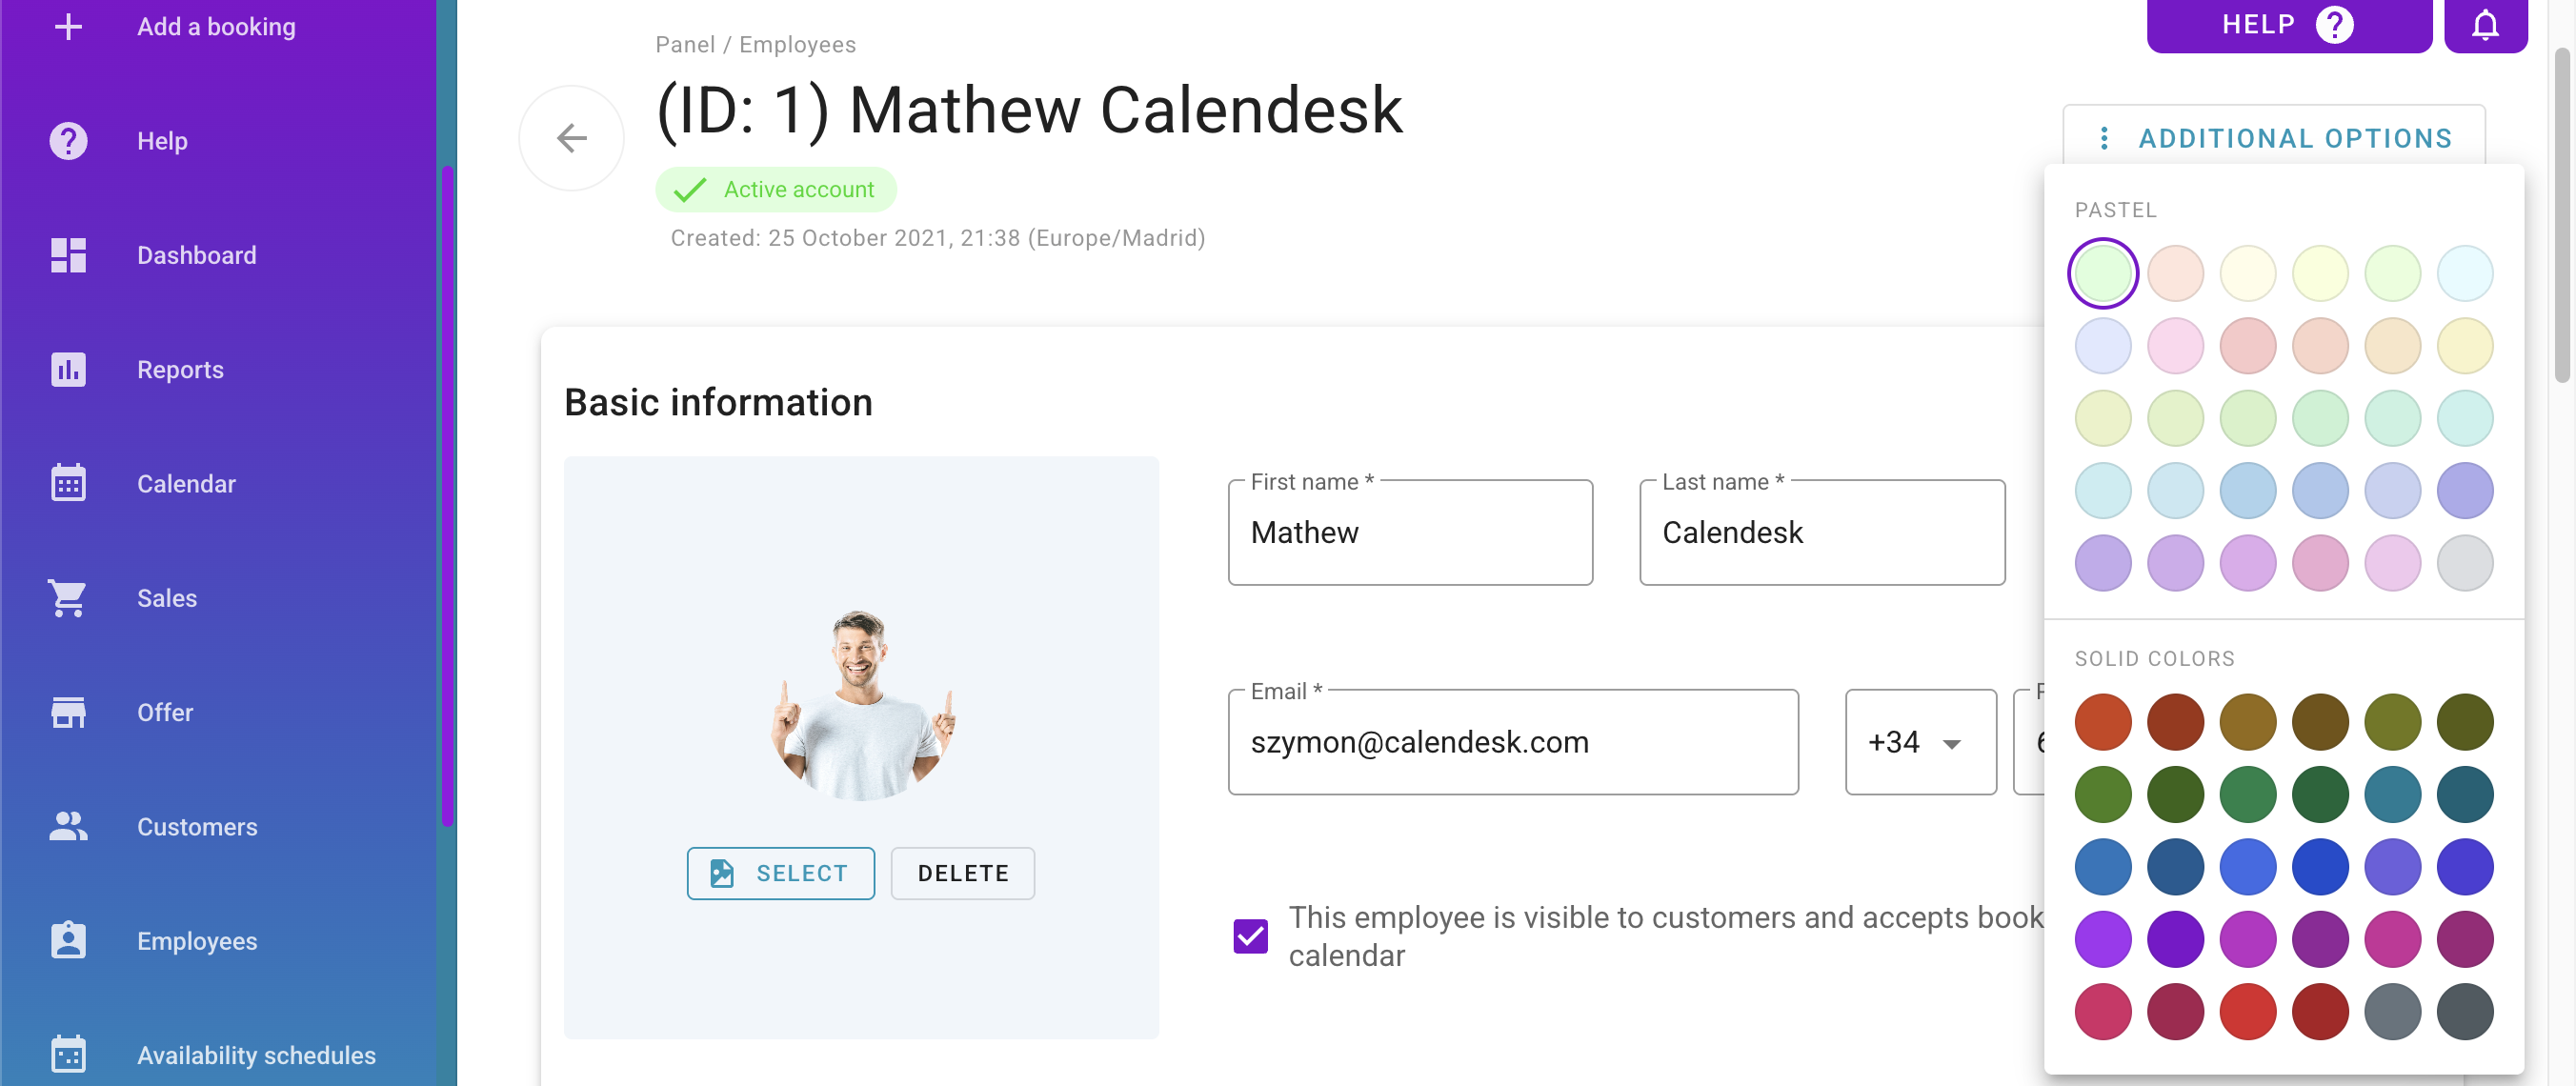
16. A new colour palette for staff accounts
Staff colours from the Employees tab mark bookings in the calendar. With a pastel palette and a team of ten, telling them apart could be guesswork.
So we've added full, saturated colours with white text and raised the contrast ratio of the existing pastels. Your old settings keep working; you don't have to change a thing. But if your 9 am calendar used to blur into one blob, you now have something to choose from.
17. Merge two accounts of the same client into one
Duplicates in the client base create themselves. Someone booked once as "Anna Kowalska" from a private address, and again from a work one. Someone typed their surname with a typo on the second visit. Someone changed their email and simply set up a new account. The result is always the same: one person's visit history splits across two or three cards and stops telling you anything.
Until now the only way to tidy that up was a request to us. Now you do it yourself.
How it works
On the client list you select two to five accounts and pick "Merge clients" from the actions menu. If you'd rather start from a single client card, its menu has "Merge with another client" and you add the rest with the search box.
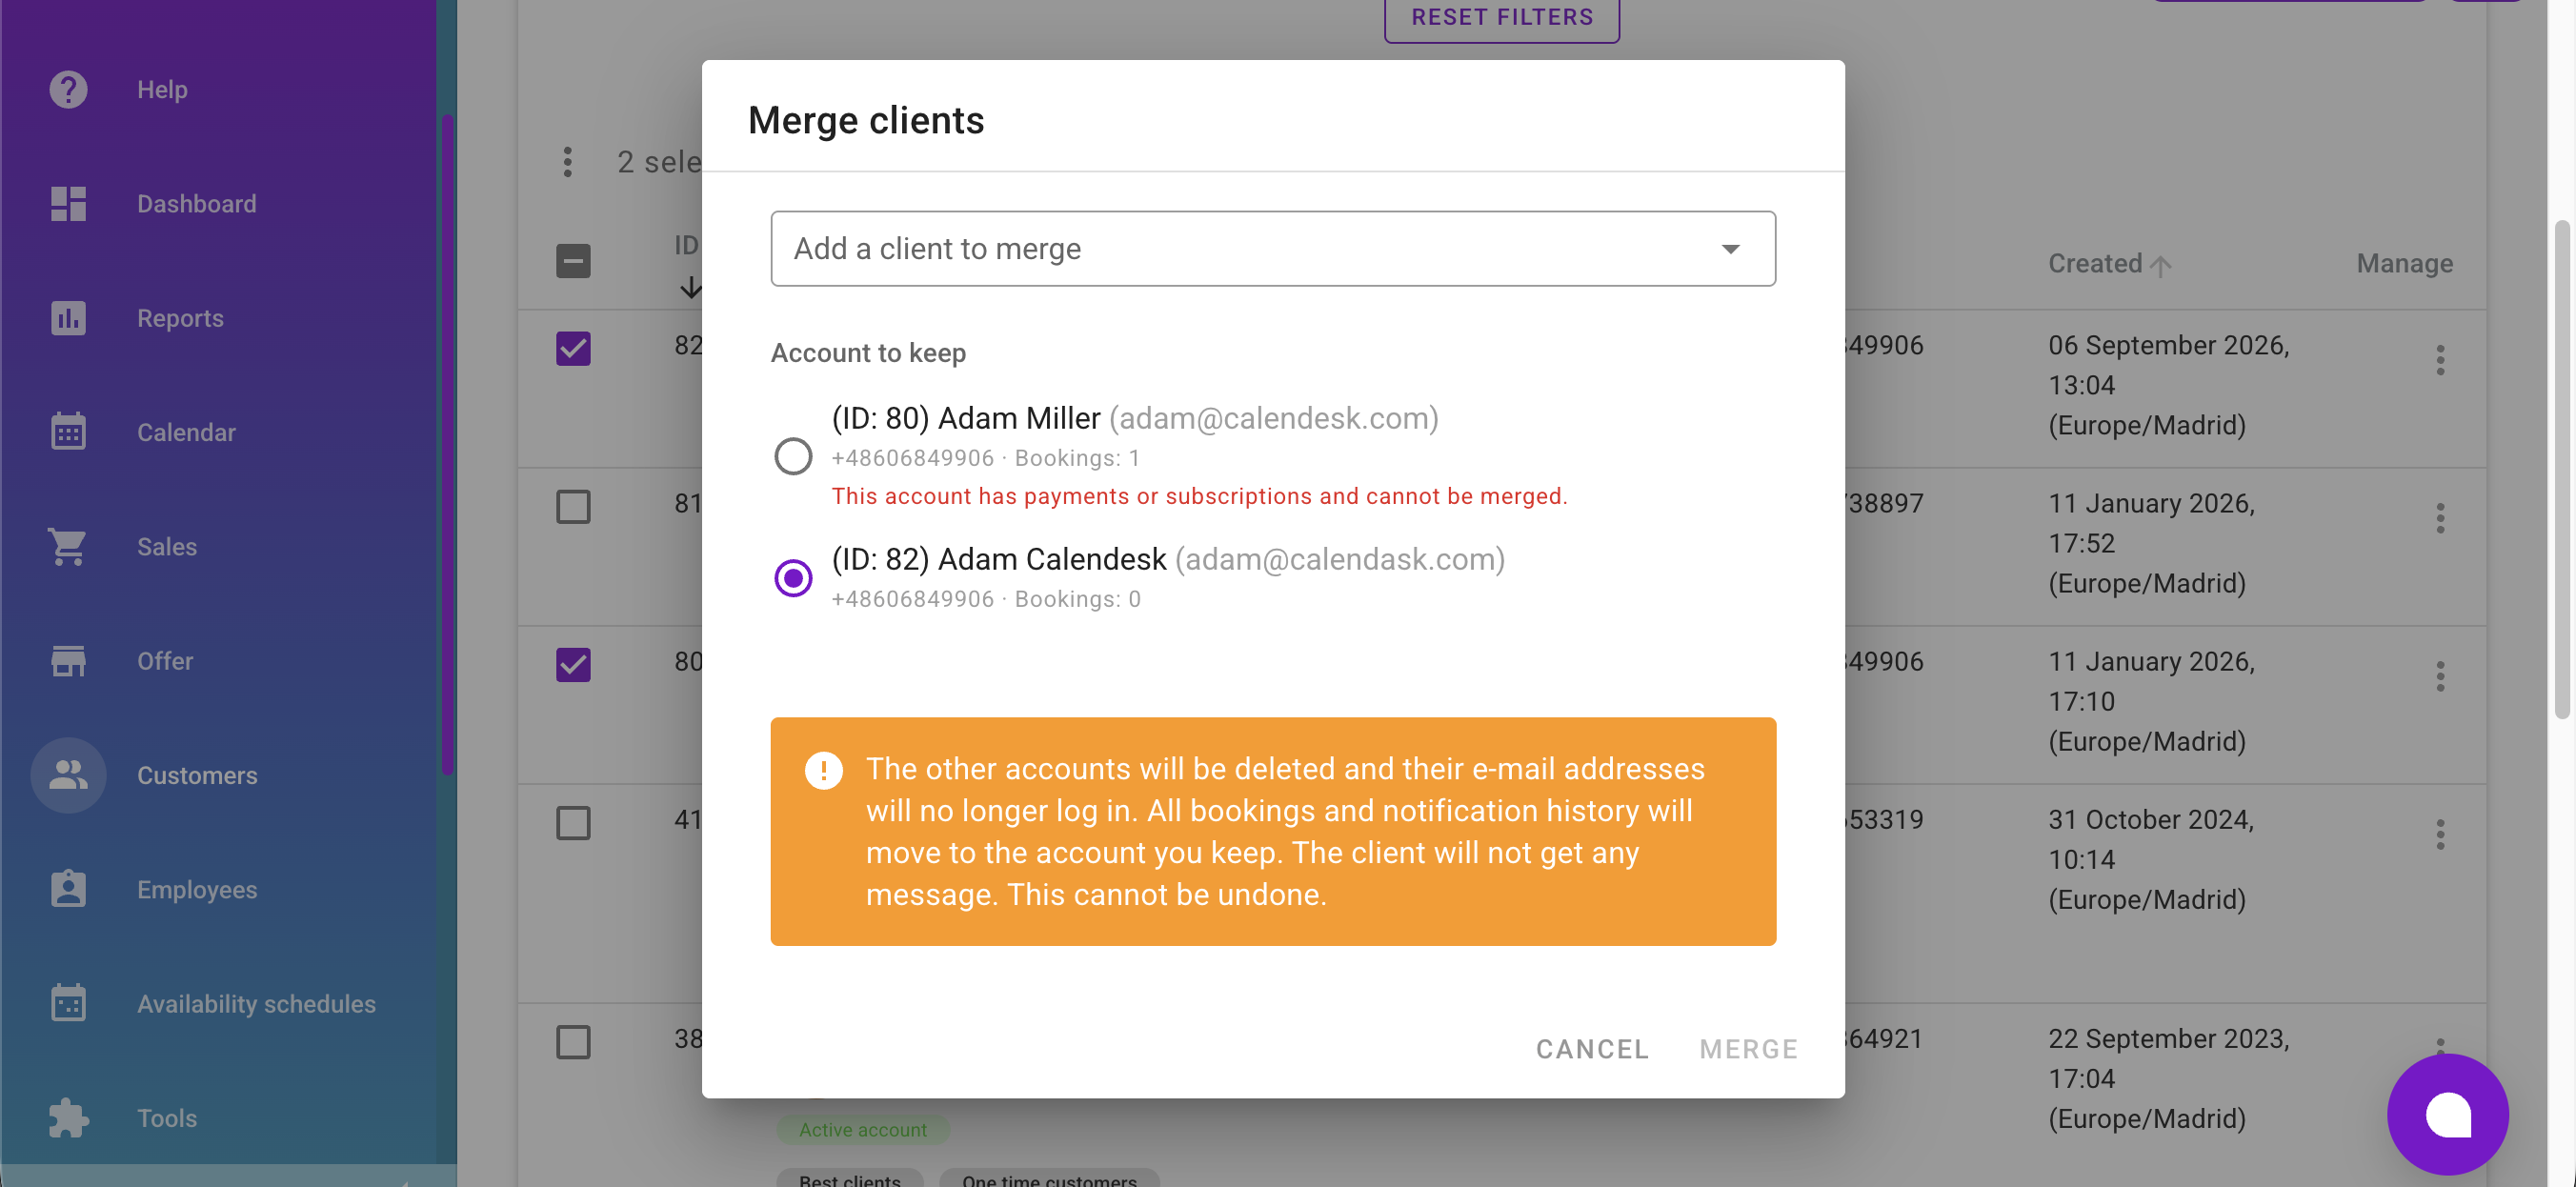
In the merge window you point to the account that stays. Next to each one you see the email, phone number and number of bookings, so you have something to base the decision on rather than guessing which card is the right one. All bookings and notification history from the other accounts move over to the chosen one. The other accounts disappear, and their addresses stop working at login.
Two things worth knowing before you click. The client gets no message about any of it, so the merge is invisible to them. And the operation can't be undone.
What you can't merge
Accounts with payments or subscriptions get blocked by the system, which says so plainly next to the entry. Money is involved there, so we deliberately kept those cases out of the automated flow. The same goes for staff accounts.
The action itself is visible to people who can edit and delete clients, meaning administrators and managers. A staff member with narrower permissions won't see it at all.
18. Changing an email address now goes through confirmation, with two new templates
Changing the email address on an account used to work like any other profile field: type the new one, save, done. The trouble is that an email address isn't an ordinary field. It's the login. A typo in the new address shut the door to the account.
The change now has two stages. After you save the new address, the account keeps running on the old one, and an email with a link goes out to the new one. The address only changes once that link is clicked. Until then, the profile shows that the change is waiting for confirmation, with the option to resend the link or cancel the whole thing.
After confirmation, a second message goes to the previous address: a note that the account's email has been changed, and to what. That's the moment the real account owner realises something is happening that they didn't do.
You'll find both emails in templates
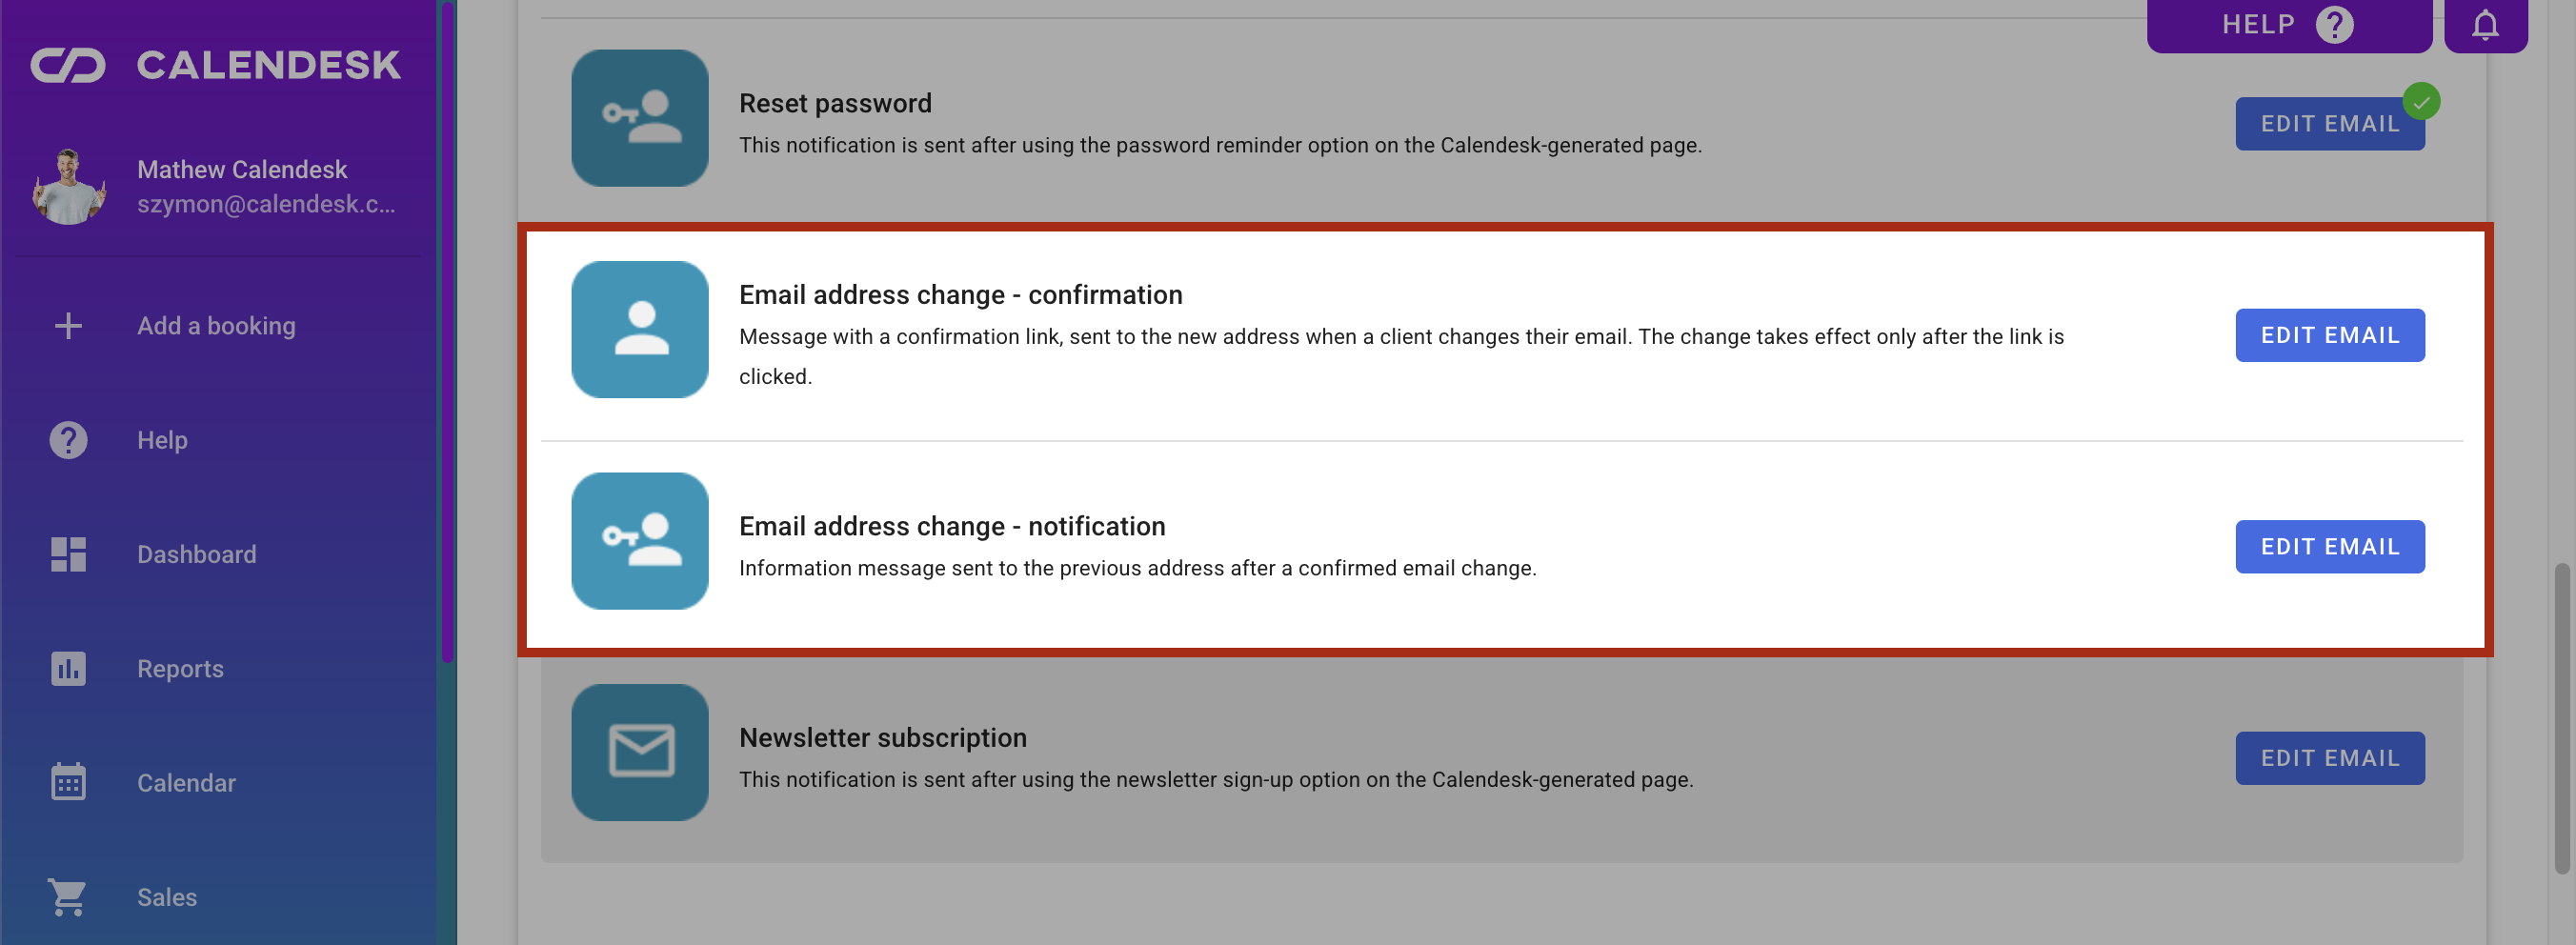
In Notifications, under the Templates tab, there's a new "Email address change" category with two entries:
Email address change - confirmation, meaning the message with the link, sent to the new address.
Email address change - notification, meaning the informational message sent to the previous address after a confirmed change. This one deliberately has no button with a link. We don't want to teach your clients that an email about login changes is something you click buttons in.
You edit both like the rest of the templates: your own subject, your own content, your logo and colours. There's also a new [NEW_EMAIL] variable, the new address, which you insert into the content from the variable list.
If you sell in several markets, you translate both templates the same way as the others. The default versions come in five languages.
19. One switch hides booking and transaction numbers from clients
The booking number is useful to you and to our support. To a client paying for a consultation it means nothing, and on the Stripe payment page or next to a service name on an invoice it simply looks technical. You've been telling us this.
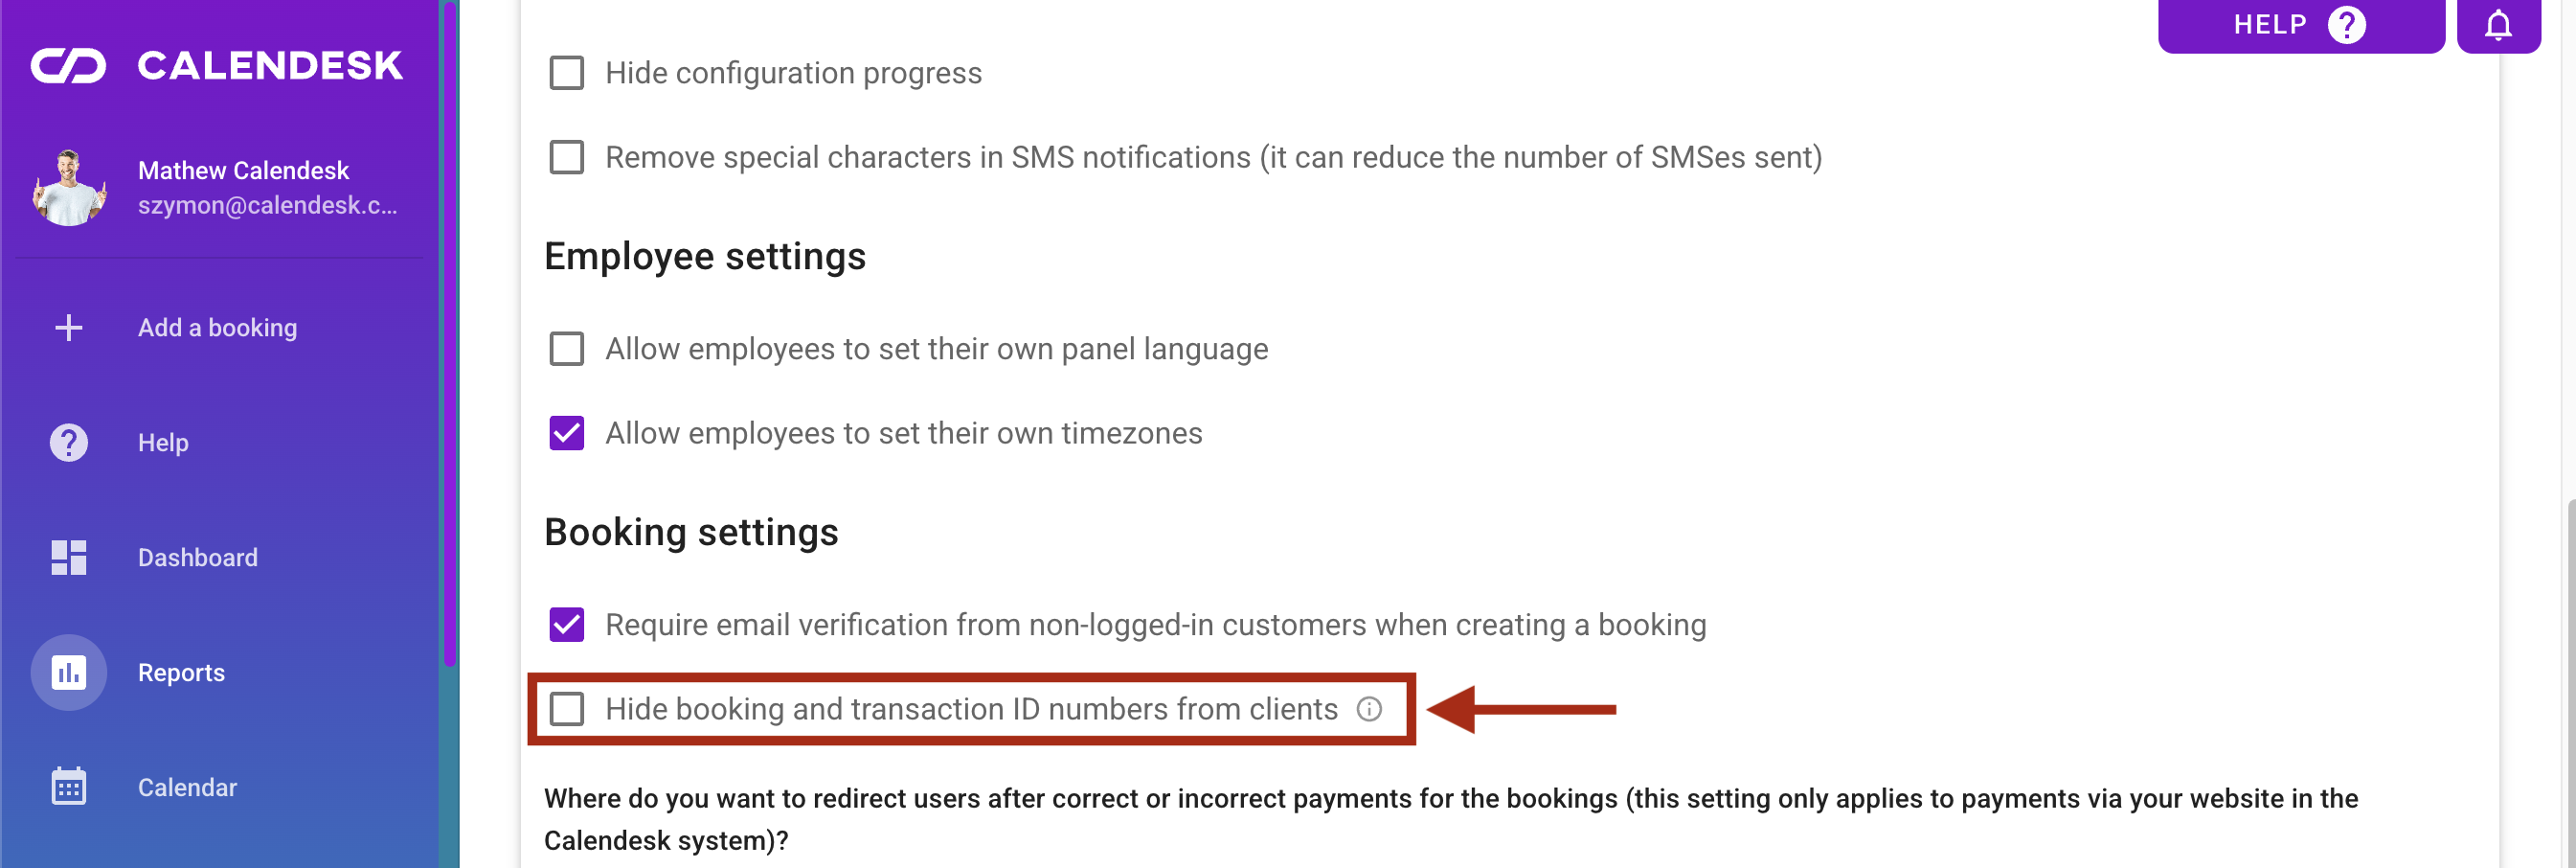
Go to Settings → Platform, scroll to the "Booking settings" section and tick "Hide booking and transaction ID numbers from clients". The switch is off by default, so if you do nothing, nothing changes for you.
Once it's on, the numbers disappear in five places at once:
on the Stripe payment page,
in the booking confirmation window on the client's page,
in the client panel, in the number columns next to bookings, payments and subscriptions, also after logging in,
in the default emails to the end client: confirmation, rescheduling, reminder, cancellation and payment request,
in the line item name on invoices from Fakturownia. The invoice number obviously stays; only our "Booking number: X" note next to the service name goes.
Beyond booking and transaction numbers, the switch also covers payment, subscription and purchased product numbers, in other words everything the end client saw as a technical ID.
Two things stay the same. In the admin panel you see all the numbers as before, so searching for a booking by its number still works. And if you insert the booking number variable into your own notification template yourself, it still fills in. The switch only clears what we add by default.
Service settings: a booking limit per period and custom values in fields
Two changes on the same card, in Offer, in the service settings.
20. The per-client booking limit now counts within a period
The limit of bookings of one service per client used to be absolute. Three and done, forever. For passes, recurring consultations or sessions with a break between series, that's not enough, because the point isn't how many someone books in a lifetime but how many in a given stretch of time.
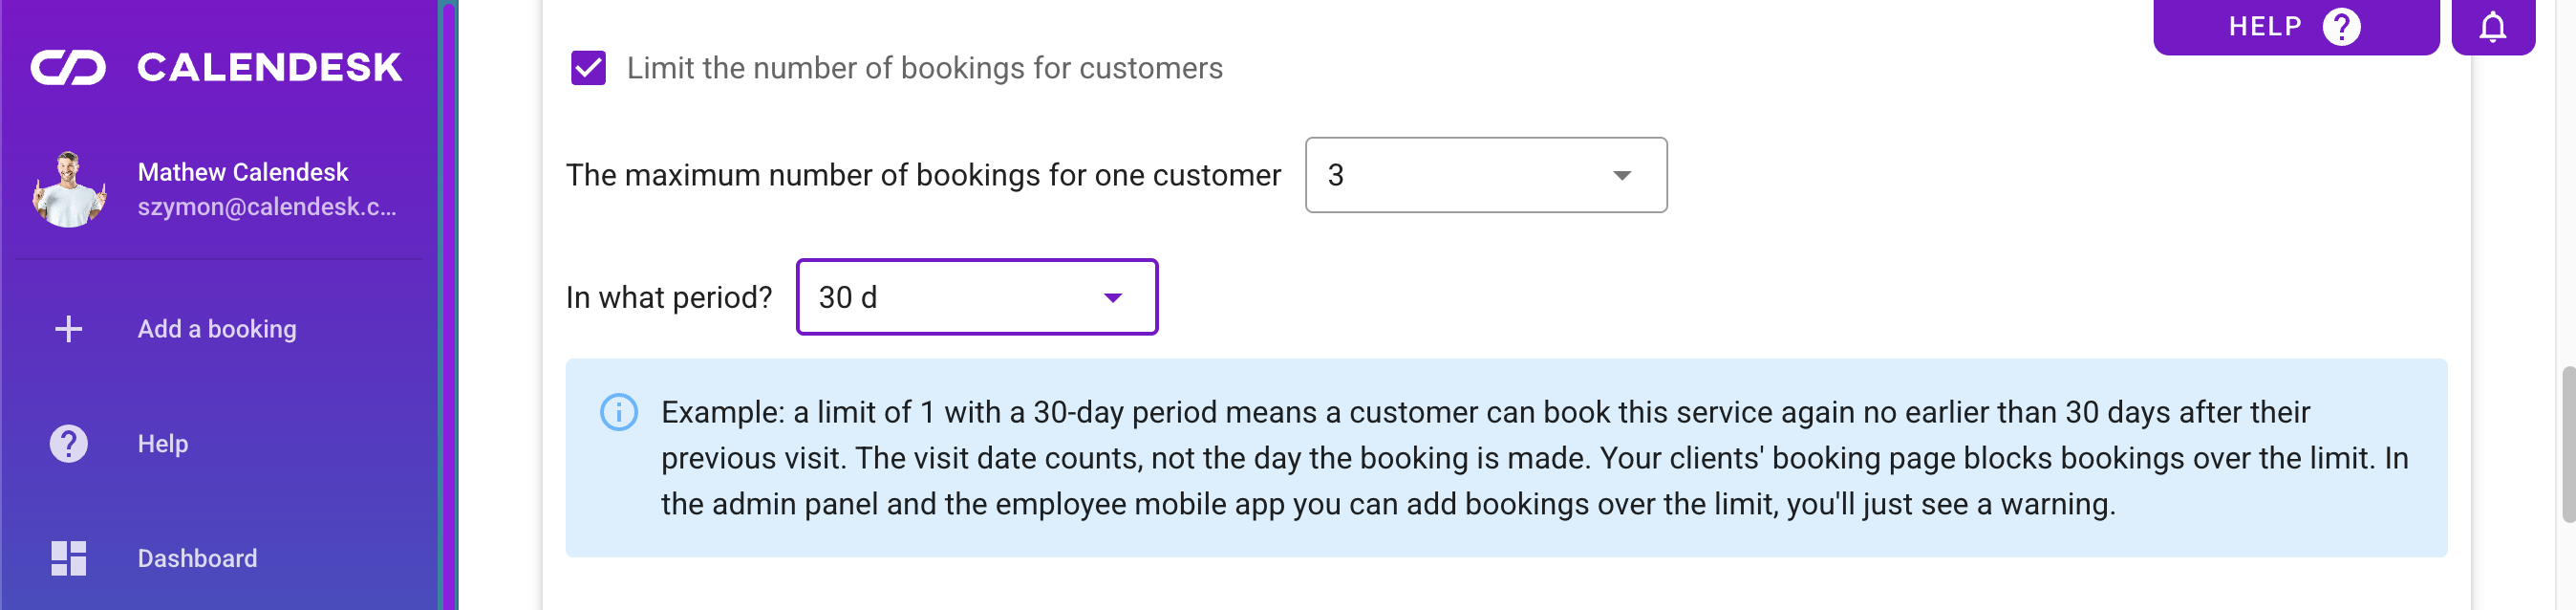
So under the maximum bookings field there's now a question: "Within what period?". You pick an hour, a day, a week, two weeks, a month, a quarter or a year from the list, and if you need something else, you type your own value. Three bookings per thirty days means exactly what it sounds like: the client uses up the pool and comes back when the period rolls over.
What counts is the appointment date, not the day the client clicks to book. That matters, because it means nobody can dodge the limit by booking three future slots in one go.
The limit behaves differently on the two sides of the system, and that's intentional. On your clients' booking page it's hard: the system simply won't let them go over the pool. In the admin panel and in the staff mobile app you'll see a warning and a question whether to create the booking anyway. A client at the desk or on the phone is often an exception you want to handle, not an error to block.
21. "Custom value" where there used to be only a list
The last change is small and probably the one you've raised most often in support tickets.
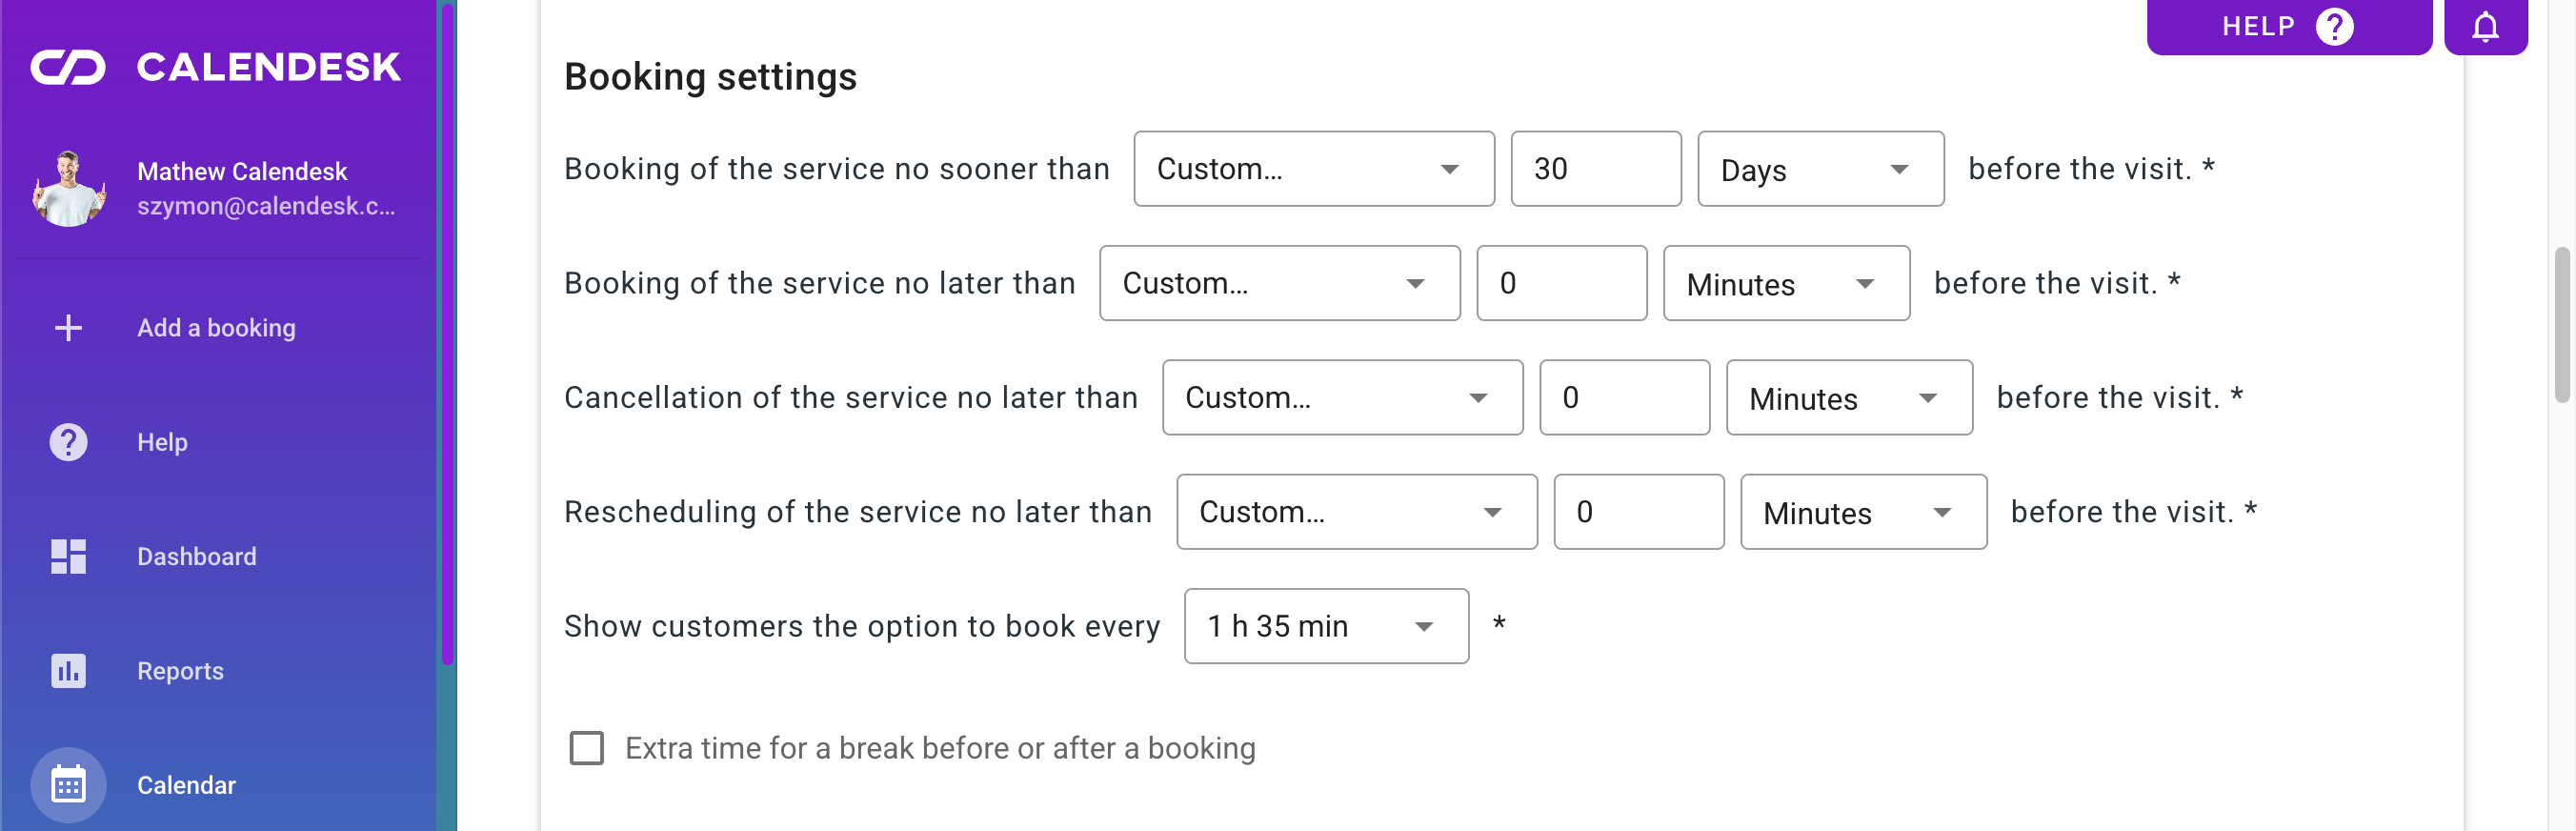
Booking settings in the service configuration form were based on preset lists. If your policy said "cancellation no later than 18 hours before the appointment" and the list offered 12 or 24, you picked whichever was closer and looked the other way.
Now each of those fields has a "Custom value" option where you type your own. This covers four settings on the service card:
book a service at the earliest,
book a service at the latest,
cancel an appointment at the latest,
reschedule an appointment at the latest.
For each of them you pick the unit: minutes, hours or days.
The same works in reminder settings, in the "Reminders – Settings" tab, in the send-time-before-booking field. Want to send a text 90 minutes before the appointment rather than one hour or two? Type 90.
We're only halfway there
Twenty-one changes in one update is a lot for a system most of you expect, above all, to keep the calendar working and stay out of the way. That's why none of them takes anything away from you. Your current settings stay where they are, and the new ones wait in the panel for the moment you need them.
Still, at the next opportunity give yourself fifteen minutes with this article on one side of the screen and the panel on the other. Set the booking step order in your calendar, load schedules for the whole year ahead, click through the widget preview. It's the kind of fifteen minutes that pays for itself in the first week and then keeps working for you every month.
And if along the way you think "shame it can't do... yet", write to us. Plenty of things on this list started as exactly that kind of sentence in a support ticket. The next release is already in production, and part of it also began in your messages.
To make sure you don't miss the next one, keep an eye on the bell in the top right corner of the panel. We collect everything that changes there, so the news will find you even if you don't happen to visit the blog.
See you at the next release! There'll be plenty to show :)